

19 Mar Everything You Need to Know to Install MgO Wall Accent Panels
Table of Contents
- 1 Key Takeaways
- 2 Tools and Materials for MgO Wall Accent Panel Installation
- 3 Preparing the Wall for Installing Magnesium Wall Board
- 4 Measuring and Cutting MgO Boards
- 5 Install MgO Board: Placement and Fastening
- 6 Finishing MgO Wall Accent Panel Installation
- 7 Best Practices for Installing Magnesium Wall Board
- 8 FAQ
You can put up an mgo wall accent panel by following simple steps. First, get ready. Next, put up the magnesium wall board. Last, finish each wall carefully. Mgo wall board is special because it is good for the environment. It does not burn easily. You can use it in homes and businesses. Builders pick mgo panels for walls that need to be strong. They also use them for walls that must keep heat in and last a long time. When you put up magnesium wall board or mgo wall board, always use the official guide for magpanel mgo boards. These boards are light. You do not need special tools. They help make buildings better for the planet. If you want perfect walls, you can hire expert or professional installation services. They can help you get great results.
Key Takeaways
Get all the tools and materials you need first. This helps make installing easier. – Measure two times before you cut MgO boards. Good measuring stops mistakes and saves time. – Leave a little space between each board when you put them up. This lets the boards move and keeps them from cracking. – Use strong fasteners that do not rust to hold the boards. This makes the boards last longer and stops rust. – When you finish, cover seams and screw holes with joint compound. This makes the wall look smooth and neat.
Tools and Materials for MgO Wall Accent Panel Installation
 Get all your tools and materials before you begin. The right tools help you work faster and safer. You will also do a better job with your mgo wall accent panels.
Essential Tools
You need the correct tools and materials to make sure your boards fit and stay in place. Here is what you should have ready:
Mgo boards (pick the right size for your wall)
Measuring tape for checking sizes
Utility knife or circular saw with diamond blade for cutting
Drill with screwdriver bit for putting in screws
Corrosion-resistant screws or nails to hold boards
Protective gloves and eyewear for safety
Level to keep boards straight
Sealing tape or weather-resistant adhesive for extra hold
Check that your tools and materials match your project needs. Using the right things helps you avoid mistakes and saves time.
Recommended Fasteners
Picking the right fasteners is important for mgo wall accent panels. The table below shows the best choices for different surfaces:
Fastener Type | Description |
|---|---|
Tapcon Concrete Screws | Good for concrete or masonry, made from corrosion-resistant materials, strong and sturdy. |
Rubber Washer Screws | Used for steel or aluminum framing, makes a watertight seal, keeps out moisture. |
These fasteners help keep your boards in place and stop damage over time.
Safety Gear
You must follow safety rules when working with mgo boards. Always use the right safety gear to protect yourself. The table below lists the most important items:
Safety Gear | Purpose |
|---|---|
Safety goggles | Keep eyes safe from flying pieces |
Nitrile gloves | Stop skin from getting irritated by dust |
N95-rated dust mask | Protect lungs from breathing in small dust |
Dust extraction system | Pulls dust out of the air while cutting |
Wet-cutting method | Makes less dust when you cut boards |
Tip: Always wear safety gear and follow safety rules to stay safe. Mgo boards can make dust, so protect your eyes, skin, and lungs.
Having the right tools and materials, using the correct fasteners, and wearing safety gear will help you install mgo boards safely and correctly. This way, your boards will last longer and look nice.
Preparing the Wall for Installing Magnesium Wall Board
Getting the surface ready is the first step for a strong and lasting wall. You want your mgo boards to stay in place and look smooth. Good site prep and framing help you avoid problems later. Follow these steps to make sure your wall is ready for mgo wall accent panels.
Cleaning and Leveling
Start by getting the surface ready. Remove dust, dirt, and any loose pieces from the wall. Use a broom or vacuum for this job. Wipe the wall with a damp cloth to pick up any leftover dust. Let the wall dry before you move on. Use a level to check if the wall is flat. If you find bumps or dips, fill them in or sand them down. A flat wall helps your boards fit tight and look neat.
Tip: Let your mgo boards sit in the room for one to two days before you install them. This helps the boards adjust to the room’s air and temperature.
Surface Inspection
Look over the wall for cracks, holes, or uneven spots. Getting the surface ready means fixing these problems before you start. Patch any cracks or holes with filler. Make sure the wall is dry and solid. Mgo boards work well on concrete, brick, or masonry walls. If you have one of these surfaces, use a masonry adhesive for extra hold. Good site prep and framing make your wall strong and safe.
Planning Layout
Planning your layout saves time and stops mistakes. Use a pencil or chalk to draw lines on the wall. Mark where each board will go. This helps you keep the boards straight and even. Leave a small gap, about 1/8 inch, between each board. This gap lets the boards expand and contract with changes in temperature. Keep the room’s air and temperature steady while you work. Check your layout as you go to make sure the boards line up. Getting the surface ready and planning your layout will give you a smooth, professional wall.
Note: Careful planning and layout help you use your mgo boards wisely and avoid waste.
Measuring and Cutting MgO Boards
 Accurate Measurements
 Accurate Measurements
Start your project with careful measuring and planning. You want your mgo boards to fit perfectly on your wall. Use a tape measure to check the height and width of the area. Write down each number. Double-check your work before you move on. This step helps you avoid mistakes when cutting mgo boards. Good measuring and planning save you time and materials. Always measure twice before you cut.
Marking Panels
After measuring, you need to mark your mgo boards for cutting. Place the board on a flat, stable surface. Use a straightedge or a T-square to draw your lines. Mark the lines with a pencil or chalk so you can see them clearly. Make sure your lines are straight and easy to follow. Double-check your marks before you start cutting mgo boards. Leave a small gap, about 1/8 inch, between each board for expansion. This step is important for cutting and fitting magnesium wall board.
Tip: Clear markings help you make clean cuts and reduce waste.
Cutting Techniques
You have a few options for cutting mgo boards. For most jobs, use a circular saw with a thin carbide blade. This tool gives you clean cuts and helps control dust. Always wear safety glasses and a dust mask when cutting. If you need to make small cuts, score the board deeply with a utility knife and snap it. This method works for quick jobs but may leave rough edges. Secure the board on a stable surface before cutting. Sand the edges if they feel rough after cutting mgo boards. For corners, use construction adhesive after cutting and fitting magnesium wall board to prevent cracks.
Here is a table with best practices for cutting mgo boards:
Method | Description |
|---|---|
Power Cutting | Use a circular saw with a thin carbide blade for clean cuts and long blade life. |
Dust Control | Wear a respirator and use good ventilation or a dust collection system. |
Scoring and Snapping | Score deeply with a utility knife and snap for small cuts. Edges may be rough. |
Secure the Board | Support the board on a stable surface while cutting. |
Eye Protection | Always wear safety glasses. |
Edge Finishing | Sand cut edges for a smooth finish if needed. |
Glue Corners | Apply adhesive to corners after cutting to reduce micro-cracking. |
Cutting mgo boards the right way keeps your project safe and neat. Careful measuring and planning, clear marking, and the right cutting tools help you get the best results.
Install MgO Board: Placement and Fastening
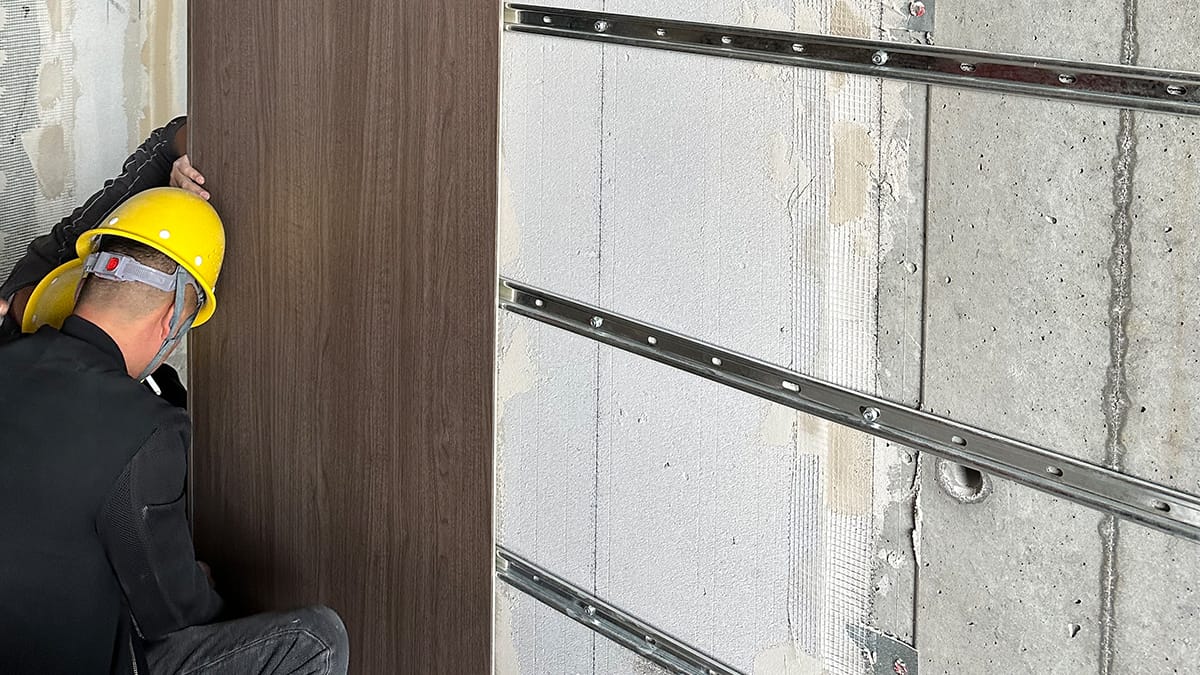 When you install mgo board, you need to follow the official MagPanel installation guidelines. This helps your wall stay strong and last a long time. Careful placement and fastening make your mgo wall board look smooth and professional. You will learn how to position the boards, use the right fasteners, and handle corners and expansion gaps.
Positioning Panels
Start by laying the mgo boards on the wall. Make sure you align the edges with the center of the vertical keels or studs. This gives your boards extra support and keeps them from moving. When positioning the boards, always check that each one sits flat against the wall. Use a level to keep the boards straight. If you see gaps or uneven spots, adjust the boards before fastening.
Here is a simple checklist for positioning the boards:
Place each mgo wall board so the edges meet at the center of the studs.
Keep a small gap, about 1/8 inch, between each board for expansion.
Double-check that the boards are level and flush with the wall.
Mark the spots where you will put the fasteners.
Tip: Laying the mgo boards with care at this stage makes the rest of the installation easier.
Fastening with Ceramic Coated or Stainless Steel Hardware
After positioning the boards, you need to fasten them to the wall. Use only corrosion-resistant fasteners. Stainless steel (304 or 316 grade) or ceramic coated screws work best for mgo wall board. These fasteners stop rust and keep your wall looking good for years. For MagPanel mgo boards, 4.8 x 42mm Bi-Metal Drywall Screws are a good choice.
Follow these steps for fastening:
Start fastening from the center of the board and move outward. This keeps the board flat.
Place perimeter fasteners every 6 inches and center fasteners every 12 inches.
Keep each fastener about 9/16 inch from the edge of the board.
Do not put fasteners closer than 4 inches from the corners.
Use a screw gun for a single pass to avoid damaging the board.
Here is a table to help you remember the spacing:
Location | Fastener Spacing | Distance from Edge | Notes |
|---|---|---|---|
Perimeter | 6 inches | 9/16 inch | No closer than 4 inches from corners |
Center | 12 inches | 9/16 inch |
|
Edge | — | 10-15 mm (15-20 mm for cut edge) | Use screw gun for single pass |
Note: Always use high-grade, corrosion-resistant fasteners to prevent corrosion and ensure long-term durability.
Handling Corners and Expansion Gaps
Corners and expansion gaps need special care during installation. When laying the mgo boards, leave a small gap, about 1/8 inch, between each board. This gap lets the boards expand and contract with changes in temperature. Fill these gaps with a fire-rated sealant to keep your wall safe and fire-resistant.
For corners, use a waterproofing membrane at joints to stop water damage. Lightly sand the edges of the boards before you apply caulk or trim. This helps the caulk stick better. In wet areas, use a primer or waterproof sealant every few years to protect the mgo wall board.
Follow these best practices for corners and expansion gaps:
Leave a 1/8 inch gap between each mgo wall board.
Fill all gaps with fire-rated sealant.
Use a waterproofing membrane at corners and joints.
Sand board edges before applying caulk or trim.
Check for moisture before sealing and fix any leaks first.
Callout: Careful handling of corners and expansion gaps helps your wall stay strong and look great for many years.
By following these steps, you make sure your installation is safe, strong, and looks professional. Always check the official MagPanel guidelines when you install mgo board. This helps you avoid mistakes and keeps your wall in top shape.
Finishing MgO Wall Accent Panel Installation
Treating Seams and Screw Holes
 Treating Seams and Screw Holes
You want your wall to look smooth and professional. Start by treating the seams and screw holes on your boards. Place self-adhesive fiberglass mesh tape over every seam. This tape helps prevent cracks and keeps the wall strong. Next, spread a high-quality joint compound over the tape. Feather the edges so the compound blends into the boards. Let the compound dry, then sand the area with 240 grit sandpaper. Make sure you countersink all fasteners so the screw heads sit just below the surface. Fill each screw hole with joint compound and sand them flat. Use a water-resistant sealant on all joints and screw holes to protect your wall from moisture.
Tip: Always check for low spots or rough areas after sanding. Add more compound if needed for a flat finish.
Priming Panels
Before you paint, you need to prime the boards. MgO panels have an alkaline surface. Use a primer made for concrete or masonry. This type of primer creates a neutral base and helps the paint stick well. A good primer is key for a professional finish and long-lasting color. Make sure you cover the entire wall with primer, including all seams and screw holes.
Use a roller or brush for even coverage.
Let the primer dry fully before painting.
Painting and Sealing
After priming, you can paint your wall. Pick a high-quality paint that works with MgO boards. Apply two or more coats for full coverage. In rooms with lots of moisture, add a transparent sealant over the paint. Urethane adhesives and elastomeric caulking work well as sealants. These products protect your wall and keep it looking new.
Step | What to Check For |
|---|---|
Seams & Joints | Smooth, feathered, no cracks |
Screw Holes | Fully filled, sanded flat |
Surface | Even, no bumps or rough patches |
Alignment | Level and plumb |
You should always check your wall after finishing magnesium wall board installation. Look for smooth seams, filled holes, and even surfaces. Make sure your boards line up and the wall looks level. Careful finishing magnesium wall board installation gives you a strong, beautiful wall that lasts.
Best Practices for Installing Magnesium Wall Board
Common Mistakes
You want your wall to look great and last a long time. Avoiding common mistakes helps you get the best results. Many people forget to leave expansion gaps between boards. This can cause the wall to crack when the boards move. Some skip cleaning the seams, which makes tape and compound peel off later. Others use the wrong fasteners, leading to rust or loose boards. Rushing through measuring or cutting can leave gaps or uneven edges. Not checking for level boards can make the wall look crooked. Always check your work as you go.
Tip: Take your time with each step. Careful work leads to a smooth installation and a strong wall.
Pro Tips
Experienced installers use smart tricks to make their walls look professional. You can use these tips to get better results with your boards:
Tip | Description |
|---|---|
Gives extra strength in busy spots on the wall. | |
Layer boards | Makes the wall more stable and reduces joint filling. |
Add a corner bead | Stops chipping and keeps edges neat. |
Use PVC corner guards | Last longer and protect corners in busy areas. |
Clean the seams | Helps tape and compound stick better to the boards. |
Light-colored paint | Makes the wall look bigger and brighter. |
Start with a small area | Builds your confidence before you cover the whole wall. |
Try these ideas to make your wall stand out and your boards last longer.
Quick Checklist
You can use this checklist to make sure you follow every step for a strong wall and a smooth installation:
Step | Description |
|---|---|
Make sure the wall is clean and dry before you start. | |
2. Material Inspection | Check all boards and supplies for damage or defects. |
3. Screw Head Treatment | Cover screw heads with joint compound for a flat wall. |
4. Quality Inspection | Look over the wall to make sure it meets all standards. |
Remember: Careful planning and checking help you avoid problems and keep your wall looking its best.
You can get a smooth mgo wall accent panel if you follow each step carefully. First, clean the wall well. Then, measure and cut the boards to fit. Check every joint to make sure it lines up. Use the checklist so you do not make mistakes. If you want the best wall, you can hire professional or expert installation services. When you finish, keep your wall looking good by following these maintenance tips:
Maintenance Aspect | Details |
|---|---|
Structural Integrity | Mgo wall accent panel stays strong after getting wet and drying out. |
Warranty and Support | Many brands give you a warranty for 10 to 25 years on the wall and boards. |
Finishing Options | You can paint, stain, or seal the boards to protect them more. |
Compatibility | Make sure the wall and boards work with all sealants and glues. |
Optimal Performance in Humid Environments | Seal all joints and edges to keep out moisture. |
Always look at the official rules and FAQs for your mgo wall accent panel installation. This helps your wall and boards last a long time.
FAQ
How do you cut MgO wall panels safely?
You should use a circular saw with a diamond or carbide blade. Always wear safety goggles, gloves, and a dust mask. Cut panels on a stable surface. Use a dust extraction system or cut outdoors for better air quality.
Can you install MgO panels in bathrooms or kitchens?
Yes, you can use MgO panels in wet areas. Make sure you seal all joints and edges with a waterproof sealant. Use a primer before painting. This helps protect the panels from moisture and keeps them strong.
What paint works best on MgO wall panels?
You should use acrylic latex paint or masonry paint. Always apply a primer first. This helps the paint stick and last longer. Avoid oil-based paints because they may not bond well with MgO surfaces.
Do MgO panels need expansion gaps?
Yes, you must leave a 1/8 inch gap between each panel. This gap lets the panels expand and contract with temperature changes. Fill the gap with fire-rated or flexible sealant for best results.
How do you fix cracks or chips in MgO panels?
Clean the damaged area first. Fill cracks or chips with joint compound or patching material. Sand the surface smooth after it dries. Prime and paint the repaired spot to match the rest of the wall.