

28 Jul Top Tips to Lower Your Subfloor Replacement Cost in 2025
Table of Contents
Ever pulled up old carpet and found a soft spot or squishy board underneath? That sinking feeling can hit your wallet hard. The good news? You can keep your subfloor replacement cost low if you know what to expect. In 2025, most homeowners spend between $900 and $3,000 for this project.
Cost Aspect | Details |
|---|---|
Typical range | $900 – $3,000 |
Average for 300 sq. ft. | $1,560 |
Cost per sq. ft. | $3 – $10 |
Labor per hour | $25 – $30 |
With a few smart choices, you can save money and still get sturdy, long-lasting floors.
Key Takeaways
Subfloor replacement costs can be very different. The price depends on room size, materials, labor, and where you live. Make sure to plan your budget with care.
Fix only the damaged spots to save money. Do not replace the whole subfloor if you do not need to.
Pick your materials with care. OSB is cheap and good for dry rooms. Plywood is strong and lasts a long time. MgO board protects best but costs more at first.
Hire a skilled contractor who can do both subfloor and flooring. This can lower labor costs and help avoid expensive mistakes.
Check for moisture and damage often. This helps you find problems early. It can make your subfloor last longer and save you money on big repairs later.
Subfloor Replacement Cost Factors
When you start planning for a new floor, you might wonder why the price can swing so much. The truth is, several factors shape your subfloor replacement cost. Let’s break down what really matters.
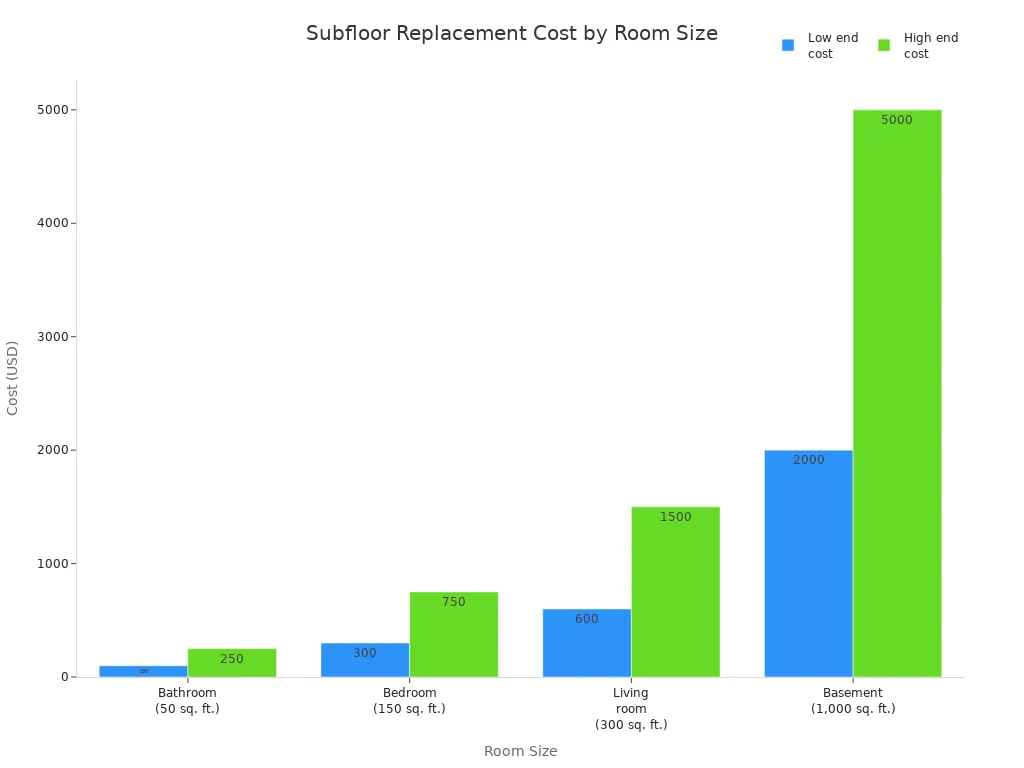
Area Size
The size of the space you need to fix or replace makes a huge difference. Bigger rooms need more materials and more time to finish. This means your total bill goes up as the square footage increases. For example, replacing the subfloor in a small bathroom costs much less than doing the same job in a large living room.
Estimated Replacement Cost Range | |
|---|---|
50 | $175 – $600 |
100 | $350 – $1,200 |
200 | $700 – $2,400 |
500 | $1,750 – $6,000 |
1,000 | $3,500 – $12,000 |
2,000 | $7,000 – $24,000 |
3,000 | $10,500 – $36,000 |
You can see that as the area grows, the total subfloor replacement cost rises quickly.
Smaller rooms, like bathrooms, sometimes have a higher cost per square foot because of tricky corners and plumbing. Larger rooms, such as bedrooms or living rooms, usually have a lower cost per square foot since the work is more straightforward.
Average Total Cost Range (USD) | |
|---|---|
50 | $110 – $240 |
100 | $220 – $475 |
200 | $440 – $950 |
500 | $1,100 – $2,400 |
750 | $1,650 – $3,550 |
1,000 | $2,200 – $4,750 |
1,200 | $2,650 – $5,700 |
1,500 | $3,300 – $7,100 |
2,000 | $4,400 – $9,500 |
2,500 | $5,500 – $11,900 |
Material Choices
The type of subfloor you pick has a big impact on your budget. Plywood and oriented strand board (OSB) are common choices. Plywood usually costs more than OSB, but it’s strong and works well in dry areas. OSB is the most budget-friendly, but it may not last as long in damp spaces. MgO board is another option. It costs more upfront but offers better durability, fire resistance, and moisture protection.
Sheet Size | Thickness | Approximate Cost per Sheet | |
|---|---|---|---|
Plywood | 4×8 feet | 3/4 inch | $21.50 |
OSB | 4×8 feet | 23/32 inch | $16.50 |
MgO boards run between $1.50 and $3.00 per square foot, while OSB can be as low as $0.50 to $1.00 per square foot. Plywood sits in the middle. If you need moisture resistance, you might pay up to $9 per square foot for special products. The material you choose affects both the price and how long your floor will last.
Labor
Labor is another big part of your subfloor replacement cost. If you hire a licensed contractor, you pay more, but you get peace of mind. Contractors handle the job from start to finish, cover mistakes, and offer warranties. Handymen charge less per hour, but they may not have the skills or insurance for big jobs.
Cost Range (USD) | |
|---|---|
Subfloor repair labor | $300 – $700 |
Subfloor replacement labor | Up to $3,000 |
Flooring contractor labor rate | $60 – $120 per hour |
For a basic subfloor installation in a 134-square-foot room, labor costs range from about $127 to $146. If your project is more complex, or if you live in a city, expect to pay more.
Tip: Labor costs can make up a large chunk of your total bill. If you can do some prep work yourself, like moving furniture, you might save a little.
Location
Where you live also affects your subfloor installation cost. In big cities, labor and materials cost more because of higher demand and living expenses. In rural areas, prices are usually lower, but you might pay extra for delivery or have fewer choices.
Labor costs are higher in cities with strong unions or high taxes.
Material prices drop in regions close to suppliers.
Delivery fees go up if you live far from stores or in hard-to-reach places.
Urban areas often see higher subfloor replacement cost than rural spots. If you’re in a remote location, plan for extra shipping and handling fees.
Additional Repairs
Sometimes, you find more problems once you pull up the old floor. If your joists are damaged, you might need extra repairs. Sistering joists (adding new boards next to old ones) costs $150 to $325 per joist. Full joist replacement is much more expensive, running from $1,000 to $2,000 per joist, or even $5,000 to $20,000 for a large room.
Patching small areas: $100 to $300
Surface-level sagging repairs: $300 to $2,000
Sistering joists: $100 to $325 per joist
Full joist replacement: $1,000 to $2,000 per joist
If you need permits, fix moisture or pest damage, or have hard-to-reach joists, your total cost will rise. Choosing sistering over full replacement can save money if the joist is still strong.
Note: Always check for hidden damage before you start. Surprise repairs can push your budget higher than expected.
When you add up all these factors, you get the average cost to replace subfloor in your home. Knowing what affects your subfloor replacement cost helps you plan ahead and avoid surprises.
How to Lower the Cost to Replace Subfloor

Limit Replacement Area
You do not always need to replace your entire subfloor. If you see damage in only one spot, focus on that area. This approach saves you money and time. Many homeowners think they must rip out everything, but that is not true. You can cut out and patch just the damaged sections. This method keeps your project small and your subfloor replacement cost low.
Tip: Always check for hidden damage before you start. If you find mold or water damage, fix only what is necessary. This way, you avoid spending more than you need.
Choose Cost-Effective Materials
Picking the right material makes a big difference in your budget. Some materials cost less but still last a long time. Here is a quick comparison to help you decide:
Subfloor Material | Cost (per sq ft) | Pros | Cons | Best For |
|---|---|---|---|---|
Oriented Strand Board (OSB) | Lower cost, easy to install, strong, eco-friendly | Swells with moisture, unfinished edges | Tight budgets, most rooms | |
Plywood Sheathing | $0.50 – $2.00 | Strong, durable, moisture resistant | Unfinished surface, not for visible areas | Most structural subfloor installations |
Concrete | $6.00 – $8.00 | Very durable, mold resistant, smooth for tile | Cold, expensive, needs moisture barrier | Garages, basements, slab homes |
OSB gives you the best balance of price and strength. Plywood costs a bit more but works well in places that get wet. If you want to save money over many years, consider MgO board. It costs more at first but lasts longer and needs less repair. MgO board resists fire, water, and pests, so you will not have to replace it as often. This choice can lower your total cost to replace subfloor over time.
Streamline Labor
Labor can eat up a big part of your budget. You can save by making the job easier and faster. One smart move is to hire a contractor who does both subfloor and flooring installation. This way, you avoid paying two crews and cut down on mistakes. Contractors who handle both jobs can plan better, work faster, and keep your project on track.
Here are some ways to make labor more efficient:
Use a beater block and sledgehammer to fit boards tightly.
Stagger the joints for extra strength.
Use leftover pieces to start new rows.
If the last row is narrow, trim the first row to make it wider.
Add blocking under narrow rows for support.
Note: Good planning and the right tools help you finish faster and avoid costly errors. If you are not sure, hiring a pro can save you money in the long run.
Prevent Hidden Costs
Hidden costs can sneak up on you during a subfloor project. Moisture damage, mold, and extra repairs can make your bill much higher. To avoid these surprises, get a professional inspection before you start. A pro can spot problems you might miss, like hidden water damage or weak joists.
Common hidden costs include:
Moisture damage that needs extra repairs
Mold removal
Full flooring replacement
Dumpster rental and debris disposal
Equipment rentals for tile removal or dust control
Damage to cabinets or walls
You can prevent these costs by:
Checking for moisture and fixing leaks early
Using materials that resist water and mold
Planning for waste and cleanup
Hiring skilled contractors who know what to look for
Tip: Always add 10-15% to your budget for surprises. Measure your space carefully and get several quotes. This helps you stay within your planned subfloor replacement cost and avoid last-minute expenses.
Material Options
When you pick a subfloor material, you want something strong, long-lasting, and right for your budget. Let’s look at the three most popular choices: plywood, OSB, and MgO board. Each one has its own strengths and weaknesses.
Plywood
Plywood is a classic choice for subfloors. You get layers of wood glued together, which makes it tough and stable. Plywood works well in most rooms, even kitchens and bathrooms. It holds nails and staples tightly, so your floors stay put.
Pros:
Strong and sturdy
Good water resistance for most homes
Easy to handle and install
Holds fasteners well
Cons:
Costs more than OSB
Can swell or warp if it gets very wet
Needs regular checks in humid areas
Price:
Usually $0.50–$1.00 per square foot. This makes plywood a solid pick if you want a balance of cost and performance.
OSB
OSB, or oriented strand board, is the budget-friendly option. It’s made by pressing wood strands together with glue. OSB is strong and supports heavy furniture, but it doesn’t like water.
Pros:
Lower price than plywood
Strong enough for most rooms
Lightweight and easy to move
No gaps or weak spots
Cons:
Swells and weakens if it gets wet
Not good for bathrooms or basements
Rough surface—not for visible floors
Price:
About $1.50–$2.50 per square foot. OSB is best for dry, low-traffic areas.
MgO Board
MgO board is the new kid on the block. It’s made from minerals, not wood, so it stands up to water, mold, and even fire. MgO boards are tough and last a long time, but they cost more up front.
Pros:
Super durable and strong
Blocks water, mold, and rot
Fire resistant—great for safety
Eco-friendly and recyclable
Cons:
Higher initial cost
Can be hard to find in some stores
Needs careful handling before installation
Price:
Usually $1.50–$3.50 per square foot. You pay more at first, but you save on repairs and replacements later.
Tip: If you want the best protection in wet or busy areas, MgO board is your best bet. For most homes, plywood gives you a good mix of price and strength. OSB works if you need to save money and your space stays dry.
Here’s a quick comparison:
Material | Durability & Moisture Resistance | Price (per sq ft) | Best Use |
|---|---|---|---|
Plywood | Strong, decent water resistance | $0.50–$1.00 | Kitchens, bathrooms |
OSB | Strong, poor water resistance | $1.50–$2.50 | Dry, low-traffic rooms |
MgO Board | Most durable, water/fire proof | $1.50–$3.50 | Wet, high-traffic areas |
DIY vs. Professional Help
 When DIY Makes Sense
 When DIY Makes Sense
Thinking about fixing your subfloor yourself? Sometimes, DIY can save you money, especially if you only need to patch a small area. You might want to try it if you have some carpentry skills and the damage is not too big. Here are some signs that DIY could work for you:
The damage is in one spot, not the whole floor.
You feel confident using tools and measuring materials.
You have done home repairs before.
The job does not involve removing walls or fixing joists.
You do not see signs of major water damage, mold, or sinking floors.
DIY can cut out labor costs, which often run $45 to $50 per hour. You will still pay for materials, and you might need to buy or rent special tools. If you make a mistake, though, you could end up spending more to fix it later. Sometimes, a quick patch with thin plywood seems cheap, but it can lead to squeaky or spongy floors. Doing the job right the first time is usually less expensive in the long run.
Tip: If you see water stains, mold, or warped boards, it is safer to call a pro. Big repairs or full subfloor replacement often need expert help.
Hiring a Pro
If the damage is serious or you do not feel comfortable with tools, hiring a professional is the smart move. A good contractor will spot hidden problems, fix uneven floors, and make sure your new subfloor lasts. Here are some tips for finding the right person:
Look for contractors with experience in subfloor replacement.
Ask if they can check for damage to joists or recommend a structural engineer if needed.
Check reviews and ask for references to make sure they do quality work.
Make sure they can handle repairs for water damage or work with other pros, like plumbers.
Get several quotes and ask detailed questions about materials, labor, and cleanup.
A general contractor can manage the whole project for you. They know how to keep things moving, avoid mistakes, and finish on time. They also help you pick the best materials and may offer warranties for peace of mind. While they add a markup to the total cost, their skills can actually lower your overall cost to repair subfloor by preventing delays and extra repairs.
Note: Always ask for bids from a few contractors. This helps you find the best value and makes sure you get the job done right.
Maintenance and Prevention
Keeping your subfloor in good shape does not have to be hard. With a little attention and some smart habits, you can make your floors last much longer and avoid big repair bills. Let’s look at how you can stay ahead of problems.
Regular Checks
You should check your floors often. Walk around and listen for squeaks or feel for soft spots. If you spot any, take a closer look. Fixing small issues right away keeps them from turning into expensive repairs. When you catch leaks or moisture early, you stop water from soaking into the subfloor. This simple habit can add years to your floor’s life.
Regular maintenance, like fixing plumbing leaks and keeping an eye out for moisture, really pays off. If you ignore these problems, your subfloor might only last 20 to 30 years. But if you stay on top of things, it could last 50 years or more. Good materials and proper installation help too. By acting fast, you avoid water damage, soft spots, and squeaky boards—all things that lead to costly replacements.
Tip: Make a habit of checking under sinks, near appliances, and around toilets every few months. Early action saves money!
Moisture Control
Moisture is the enemy of a healthy subfloor. You can fight back with a few easy steps:
Use moisture barriers under your floors to block water from below.
Pick moisture-resistant adhesives and underlayments for extra protection.
Keep crawl spaces and basements well-ventilated to stop damp air from building up.
Test for moisture every few months, especially if you live in a humid area.
Clean up spills right away and keep indoor humidity between 35% and 55%.
If you want to go the extra mile, install vapor barriers and use waterproof sealants along seams. Let new flooring materials sit in the room for a couple of days before installing them. This helps them adjust to the room’s temperature and humidity.
Note: Professional installers can test for hidden moisture and make sure your subfloor is ready for new flooring. This step prevents future headaches and keeps your floors strong for years.
By following these simple steps, you can keep your subfloor solid, safe, and ready for anything. A little prevention now means big savings later!
Subfloor Replacement Cost Savings Checklist
Ready to save money on your subfloor project? Use this checklist to keep your costs down and your results solid. Each step helps you avoid mistakes, protect your investment, and make the job smoother.
Remove Moldings First
Take off all case and stop moldings around doors before you start. This gives you a cleaner edge and stops you from having to trim flooring later.Inspect for Damage
Look closely at your subfloor. Check for water damage, rot, loose nails, cracks, or sagging. Catching these problems early means you can fix them before they get worse—and more expensive.Clean the Surface
Sweep and vacuum the subfloor. Remove dust, dirt, glue, and old paint. A clean surface helps new flooring stick better and last longer.Level and Secure
Make sure your subfloor is flat and firmly attached to the joists. Use a self-leveling compound or sand down high spots. Tighten any loose boards. This step keeps your new floor from squeaking or shifting.Control Moisture
Check that the subfloor is dry. Fix any leaks and keep the room at the right temperature and humidity. This protects your new floor and keeps your warranty safe.Prime if Needed
If your flooring type calls for it, use a primer on the subfloor. This helps with adhesion and blocks moisture.Set Up a Cutting Area
Create a spot outside or in your garage for cutting boards. This keeps dust out of your home and makes cleanup easier.
Tip: Use a subfloor repair calculator to estimate your costs before you start. Planning ahead helps you avoid surprises and stick to your budget.
Follow this checklist, and you’ll set yourself up for a smooth, cost-effective subfloor replacement.
You can lower your subfloor replacement cost with a few smart moves. Start by planning ahead and checking your floors often. Always get several quotes from different contractors. This helps you spot the best price and quality. Try to combine flooring projects to save on labor. Fix small problems early so they do not turn into big repairs. When you take these steps, you keep your home strong and your wallet happy. Ready to get started? Take action now and enjoy sturdy floors for years! 🚀
FAQ
How do I know if my subfloor needs replacing?
You might notice squeaky floors, soft spots, or a musty smell. If your floor feels uneven or bouncy, check underneath. Water damage or mold are big warning signs. When in doubt, ask a pro for an inspection.
Can I replace just part of my subfloor?
Yes! You can replace only the damaged section. This saves money and time. Always check for hidden problems before you start. If the damage is widespread, you may need to replace more.
What is the cheapest subfloor material?
OSB (Oriented Strand Board) usually costs the least. It works well in dry rooms. If you need better moisture protection, plywood or MgO board might be worth the extra cost.
How long does subfloor replacement take?
Most small jobs take one or two days. Bigger rooms or extra repairs can add time. If you hire a pro, ask for a timeline before work begins.
Do I need a permit to replace my subfloor?
Some cities require a permit, especially if you fix joists or structural parts. Always check with your local building office first. Skipping permits can cause problems later.