12 Aug How to Install Cement Board for Tile Projects in 2025
Table of Contents
If you want to install cement board for tile, you need a strong and water-resistant base. Cement board helps your tile project stay strong and safe from water. It is very helpful in wet places like bathrooms and kitchens. In the last five years, more people use cement board. This is because it lasts a long time and is simple to put in. Now, there are lighter and eco-friendly choices for people who like to do projects themselves.
Aspect | Evidence Summary |
|---|---|
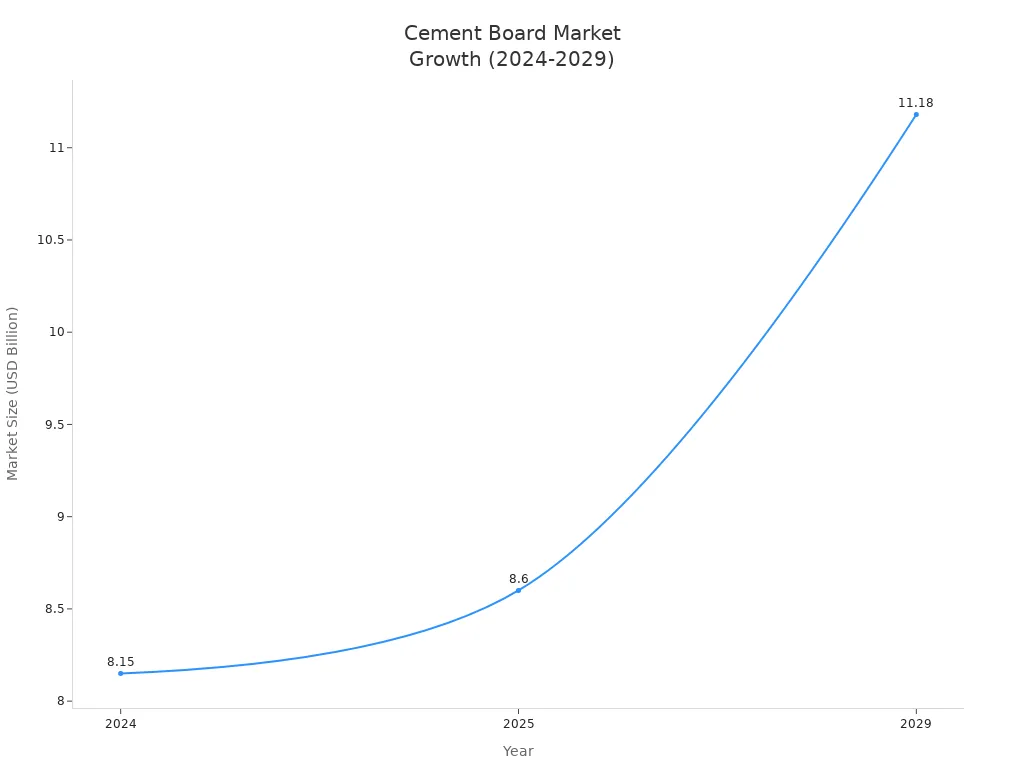
Market Growth | |
Product Innovation | Lightweight, easy-to-install boards; focus on sustainability and energy efficiency. |
Application | Cement boards preferred for high-moisture areas due to durability and mold resistance. |

This guide will show you how to install cement board the right way. Your tile projects will last longer and stay safe from water damage.
Key Takeaways
Cement board makes a strong base that does not let water in. This helps tile projects last long and stay safe from water damage. – Get your subfloor ready by cleaning it well. Make sure it is flat. Fix any broken spots before you put down cement board. – Cut and fit the cement board the right way. Use the correct tools and screws. Put the screws in evenly so the board stays tight. – Cover all seams with mesh tape that does not get ruined by chemicals. Use thin-set mortar to stop water from getting through. – Put waterproof layers in wet places like showers. This keeps your tile project safe from leaks and mold.
What Is Cement Board
Cement board gives a strong base for tile projects. People use it under tile floors, walls, and countertops. It stands out because it resists water, mold, and fire. You can trust it in wet places like bathrooms and kitchens.
Types
There are different types of cement board you can pick. Each type works best for certain jobs.
Cement Board Type | Key Features | Common Applications | Pros | Cons |
|---|---|---|---|---|
Traditional Cement Boards | Durable, moisture resistant, fire resistant | Bathrooms, kitchens, laundry rooms | High durability, moisture and fire resistance | Heavy, labor-intensive installation |
Fiber Cement Backer Boards | Water and mold resistant, fire resistant, insect resistant | Wet areas, fireplaces, high-traffic areas | Smooth surface for tile adhesion, durable | Heavier, dust when cutting, higher cost |
Magnesium Oxide Boards | Fire resistant, eco-friendly, moisture resistant | High-traffic areas, energy efficient | Lightweight, mold resistant | Less common, cost may vary |
Foam Boards | Lightweight, moisture resistant | Wet areas like bathrooms and kitchens | Easy installation, reduces labor | Less load-bearing capacity |
Glass Mat Gypsum Boards | Moisture and mold resistant | Damp environments (basements, bathrooms) | Lightweight, tile compatible | More expensive, less impact resistant |
Tip: Magnesium oxide boards are good for the planet. They use less energy to make and create fewer greenhouse gases than traditional cement boards.
Benefits
Cement board has many good points over other backer boards. It gives a base that stays strong for many years, even when wet.
Moisture Resistance: Cement board does not swell or break when wet. You can use it in showers, kitchens, and laundry rooms without worry.
Durability: This material lasts a long time. If you install and care for it right, cement board under tile can last 25 to 40 years.
Stability: Cement board stays flat and stiff. It does not bend or twist like plywood. Your tiles stay in place, even if the floor moves a bit.
Better Tile Adhesion: The smooth surface helps tiles stick well. You do not need extra glue.
Easy Installation: You can cut cement board before it gets hard. This makes it easier to fit into your space.
Fire Resistance: Cement board does not burn. It helps keep your home safe.
Eco-Friendly Options: Some boards, like magnesium oxide, use recycled stuff and make less pollution.
Advantage Category | Explanation |
|---|---|
Moisture Resistance | Cement board is very good with water. It stops warping, damage, and mold that can happen with plywood and drywall. |
Stability and Durability | Cement board is strong and does not bend. It does not crack or flex even if the floor moves, unlike plywood. |
Adhesion | The smooth finish helps tiles stick better. You do not need extra glue like you do with plywood. |
Installation Process | Cement board is easy to put in. You do not need extra water barriers in wet places, but plywood often needs them. |
Cost and Longevity | Plywood may cost less at first, but cement board lasts longer and works better in wet and busy areas. |
Cement board is the best pick for tile floors and walls. It gives you peace of mind and a surface that lasts a long time.
Tools and Materials

Before you start your tile project, you need the right tools and materials. Having everything ready will help you work faster and avoid mistakes. You also need to think about safety when handling cement board.
Tools List
You need several tools to cut and install cement board. Each tool has a special job. Here is a list to help you get started:
Utility knife – Use this for straight cuts on cement board.
Jigsaw with carbide-tipped blade – This tool helps you cut curves or holes.
Cordless drill – You will use this to drive screws into the board.
Stapler – Use this for securing mesh tape over seams.
Taping knife – This helps you apply thin-set mortar smoothly.
Notched trowel – Use this to spread mortar evenly.
Tip: Always check that your tools are clean and sharp before you begin. This makes cutting and installing cement board much easier.
You should also protect yourself while working:
Wear safety glasses and an N95 mask to keep dust out of your eyes and lungs.
Use gloves to protect your hands from sharp edges.
Make sure your workspace has good airflow.
Lift cement board with your legs, not your back, to avoid injury.
Materials Needed
Choosing the right materials will help your tile project last longer and stay safe from water. Some cement boards, like PermaBASE WP, have a waterproof core. This means you only need to waterproof the joints, screw heads, and edges. You do not need to cover the whole wall with a liquid membrane.
Here is a table of materials you need and why they matter:
Material | Description/Reason |
|---|---|
Waterproof cement boards | Boards with a waterproof core, like PermaBASE WP, help stop water damage and mold. |
Cement board screws | These coated screws hold the board tight and do not rust. |
Thin-set mortar | This mortar bonds the cement board to the floor or wall and fills joints for a smooth finish. |
Alkali-resistant fiberglass mesh tape | This tape covers seams and keeps water from getting through. |
Moisture barrier membrane (optional) | Use a plastic sheet behind the board if your project needs extra moisture protection. |
Note: Always remove drywall or green board in wet areas before you install cement board. This step helps prevent future water problems.
Preparation for Cement Board Installation
Inspect and Clean Subfloor
Before you install cement board, you need to make sure your subfloor is ready. A strong and flat subfloor helps your tile project last longer. Follow these steps to prepare the surface:
Inspect the subfloor for problems. Look for signs of moisture damage, rot, loose fasteners, cracks, or sagging. Check for termite damage and shifting boards.
Use inspection tools. Try a moisture meter to check for hidden water. Use a straightedge or level to see if the floor is flat and stable.
Fix any issues you find. Replace damaged wood or concrete. Tighten loose screws or nails. Fill cracks and gaps so the subfloor feels solid.
Clean the subfloor well. Sweep away dust and debris. Remove old glue, paint, or coatings. Use a vacuum, broom, or mop for plywood. For concrete, you might need a floor buffer or pressure washer.
Sand down any bumps. Make sure the surface is smooth and flat. This step helps the cement board sit evenly.
Tip: Never skip cleaning and sanding. Even small bumps can cause tiles to crack later.
Plan and Measure
Planning your layout helps you avoid mistakes when you install cement board on floors or walls. Good planning also follows industry standards for tile installation.
Check that your surface is level and plumb. Use a long level or straightedge to test the floor or wall.
Mark layout lines with a chalk line or pencil. These lines guide where each cement board piece will go.
Dry-fit the cement board pieces before you start the installation. Lay them out without mortar to see how they fit.
Stagger the seams so they do not line up with each other. This makes the installation stronger.
Leave a small gap (about 1/8 inch) between boards and at the edges. This space allows for movement and helps prevent cracks.
Review the guidelines from ANSI, TCNA, and NTCA. These groups set the standards for tile and cement board installation. Following their advice helps your project meet professional quality.
Note: Always agree on the plan with anyone else working on the project. Good planning makes the installation smoother and faster.
How to Install Cement Board
Installing cement board is a key step for a strong tile project. You need to follow each step carefully to make sure your tile stays in place and resists water. Here is how to install cement board the right way.
Apply Thin-Set Mortar
Start by spreading thin-set mortar on the subfloor or wall. This mortar holds the cement board in place and fills small gaps. Use a notched trowel to spread the mortar evenly. The right trowel size and mortar thickness matter for a solid base.
Installation Type | Recommended Trowel Size | Approximate Thinset Thickness |
|---|---|---|
Cement Board Installation | About 1/4 inch |
Mix the thin-set mortar as the package says.
Use the notched side of the trowel to make grooves in the mortar.
Work in small sections. This keeps the mortar from drying before you set the board.
Wipe away any extra mortar that gets on top of the board.
Tip: Always keep the surface clean after each step. This helps the tile stick better later.
Cut and Fit Boards
You need to cut the cement board to fit your space. Cutting the boards the right way keeps dust low and edges smooth.
Use powered shears like PacTool Snapper Shears or Porter Cable 6602 for most cuts. These tools make clean cuts and create very little dust.
Mark your cuts on the back of the cement board. This hides rough edges.
Keep the boards dry before you cut them. Wet boards can get fuzzy edges.
For holes or detailed cuts, use a jigsaw with a carbide blade or a rotary tool. These tools work well but can make more dust.
If you use a circular saw, attach a vacuum to control dust. Silica dust is harmful, so always wear a mask.
Clean up the edges with diagonal cutters for a neat finish.
Do not rush. Move the shears slowly for the best results.
Note: Cutting too fast can cause rolled edges. Take your time for a smooth cut.
Dry-fit each board before you install it. Lay the boards out to check the fit. Stagger the seams like bricks. This makes the installation stronger. Leave a 1/8-inch gap between boards and a 1/4-inch gap from the walls or cabinets. This space lets the boards expand and keeps them from cracking.
Fasten with Screws
Once you have the boards in place, you need to fasten them down. Use the right screws and spacing for a secure hold.
Use cement board screws made of coated steel. These screws resist rust and grip the board well.
Space the screws every 8 inches across the whole board.
Keep screws 1 inch from the edges and 2 inches from the corners.
For walls, fasten the cement board directly to the studs. For floors, set the board into the wet mortar bed.
Pre-drill holes if needed to avoid cracking.
Drive the screws so they are flush with the surface or just below it. Do not overdrive or leave them sticking out.
Leave a 1/4-inch gap between the board edges and the wall for expansion.
Tip: Always follow the manufacturer’s instructions for screw type and spacing. This helps prevent problems later.
Tape and Mortar Seams
Sealing the seams between cement board panels is important. This step keeps water out and makes the surface strong for tile.
Make sure all cement board panels are attached firmly.
Place alkali-resistant fiberglass mesh tape over every seam where two boards meet.
Use a taping knife or flat trowel to spread a thin layer of thin-set mortar over the tape.
Press the tape into the mortar so it sticks well.
Add a second layer of mortar over the tape. Smooth it out so it is even with the board.
Feather the edges of the mortar. This keeps the surface flat for tile.
Let the mortar dry fully before you start tiling. Check the mortar package for drying times.
Note: Taping and mortaring seams creates a moisture-resistant, strong surface. This step is key for a long-lasting tile job.
Best Practices and Building Code Tips
Use a subfloor that is at least 5/8 inch thick and in good shape.
Stagger the cement board joints in a brick pattern. Do not line up four corners.
Always use corrosion-resistant screws or nails.
Clean the surface after you finish installing cement board.
Follow all local building codes and manufacturer guidelines for the best results.
Callout: Working in small sections helps you keep the mortar fresh and the boards level. Always wipe the surface clean after each step.
By following these steps, you will know how to install cement board for any tile project. Careful work now means your tile will last for many years.
Cement Board Installation Tips
 Waterproofing
You must protect your tile project from water, especially in moisture-prone areas like showers and bathrooms. Cement board does not stop water by itself. To create a waterproof tile base, you need to add extra layers. Here are the best ways to waterproof cement board:
Place a vapor barrier, such as plastic sheeting, behind the cement board before you install it.
Apply a waterproofing membrane on the front. You can use a paint-on liquid or a sheet membrane.
Always tape the seams with alkali-resistant mesh tape and cover them with thinset mortar.
For the best waterproof tile base, consider foam backer boards. These boards, like Wedi Board or Schluter Kerdi-Board, are fully waterproof and easy to install, but they cost more.
Tip: Never skip waterproofing steps in wet areas. This keeps your waterproof tile floors safe from leaks and mold.
Common Mistakes
Many DIYers make mistakes that can cause problems later. You can avoid these issues by learning what to watch for:
Skipping cement board in wet areas leads to water damage and weak tiles.
Not preparing the surface causes tiles to pop off or floors to creak.
Using the wrong thickness of cement board can make the floor unstable.
Forgetting to adjust fixtures for the new floor height creates extra work.
Failing to replace old cement board after removing tile can cause leaks and grout problems.
Note: Always check your subfloor and plan for the right thickness to support a strong, waterproof tile base.
Pro Tips
You can make your installation last longer by following these professional tips:
Add extra blocking or insulation behind walls for better support.
Use the right tools for clean cuts and double-check your measurements.
Space screws 6 to 8 inches apart and keep them flush with the board.
Tape all seams and cover them with thinset mortar, feathering the edges.
Let the mortar dry fully before you start tiling.
Wear safety gear and keep your workspace well-ventilated.
A recent survey shows that 37% of professional tile installers choose cement board as their top pick for tile projects. They trust it to create a strong, waterproof tile base that lasts for years.
You now know the key steps for installing cement board. When you follow best practices, you create a strong, moisture-resistant base for your tile. Cement board works well in wet areas because it resists water and mold.
Cement board stays strong and flat, even after getting wet.
It gives tiles a smooth, stable surface.
Adding waterproof layers in showers or bathrooms helps prevent leaks.
Using thinset mortar and sealing seams keeps your tile secure.
Before you start tiling, review the tips and FAQs. This helps you avoid common mistakes and gives your project the best chance for success.
FAQ
How thick should cement board be for tile floors?
You should use cement board that is at least 1/4 inch thick for floors. For extra strength, choose 1/2 inch. Thicker boards help prevent tile cracks and keep your floor stable.
Can you install cement board directly over plywood?
Yes, you can install cement board over plywood. Make sure the plywood is clean, dry, and sturdy. Always use thin-set mortar between the plywood and cement board for a strong bond.
Do you need to waterproof cement board in a shower?
Yes, you need to waterproof cement board in showers. Cement board resists water but does not stop it. Apply a waterproof membrane or barrier to protect your walls from leaks and mold.
What screws should you use for cement board?
Use corrosion-resistant cement board screws. These screws have special coatings and threads. They hold the board tight and do not rust. Space them every 8 inches for best results.

 Waterproofing