


04 Jul Step-by-step Guide to Finishing and Connecting Magnesium Oxide Boards
Table of Contents
- 1 Key Takeaways
- 2 Magnesium Oxide Board Guide
- 3 Tools and Materials
- 4 Surface Prep
- 5 Planning Layout
- 6 Cutting Boards
- 7 MGO Board Installation
- 8 Connecting Boards
- 9 Joint Treatment
- 10 Priming and Painting
- 11 Final Steps
- 12 FAQ
- 12.1 How do you cut magnesium oxide boards without chipping?
- 12.2 Can you use regular drywall screws for magnesium oxide boards?
- 12.3 Do you need to seal magnesium oxide boards in wet areas?
- 12.4 What is the best way to clean finished magnesium oxide boards?
- 12.5 Can you paint directly on magnesium oxide boards?
You want a professional result when you work with magnesium oxide boards. This magnesium oxide board guide gives you a step by step process that helps you achieve a durable finish. You will find the boards easy to install with the right tools. Safety matters at every stage, so you must follow each instruction for safety and quality. If you want to know how to build an interior wall, this guide works for both DIYers and professionals. You will gain confidence and learn practical skills as you go.
Key Takeaways
- Magnesium oxide boards can stop water, fire, mold, and pests. This makes them strong and good for the environment. People use them in many building projects.
- Always wear safety gear like glasses, masks, and gloves. This keeps you safe from dust and sharp edges when you install the boards.
- Clean and level the surfaces before you start. This helps the boards stick well and stops cracks or movement.
- Plan and mark where the boards will go. Cut and attach the boards with screws that do not rust. Leave small gaps so the boards can move a little.
- Put tape and joint compound on the joints. Sand them until they are smooth. Then, use primer and paint to make the boards look nice and last longer.
Magnesium Oxide Board Guide
Benefits
You might wonder why the magnesium oxide board guide suggests these boards. Magnesium oxide boards have many good points compared to old materials. They can handle water, fire, mold, and bugs. Tests show these boards do better than gypsum drywall in hard situations. You can put them where there is a lot of water or fire danger, and they will last longer.
Tip: If you use the magnesium oxide board guide, your wall can stay strong and safe for a long time.
Scientists checked full walls made with magnesium oxide boards. They found that these boards make walls tougher and last longer. The boards also work with other things, like rigid foam, to make a strong wall. Your wall can hold heavy things and not break easily.
These boards are also good for the planet. They do not let out bad gases, and they stop mold and mildew. This helps you make a safer place for your family or people who use the building.
Applications
The magnesium oxide board guide can help with many kinds of building jobs. These boards are used in houses, offices, and big buildings. More people want safe and earth-friendly materials, so these boards are getting more popular.
Application Area | Market Share/Insight |
|---|---|
Residential Construction | |
Thin Boards (<8 mm) | |
Roofing (Europe, 2020) | |
Interior Wall Panels | Key Application |
Flooring & Roofing | Key Application |
Asia-Pacific Region | Over 35% market share (2023) |
You can use magnesium oxide boards for inside walls, outside layers, floors, roofs, and under tiles. The magnesium oxide board guide explains how to put them in all these places. Builders in Asia-Pacific and Europe use these boards for new buildings and fixing old ones. You can trust the magnesium oxide board guide to give you steps that work for real building projects.
Tools and Materials
Tools List
You need the right tools to work with mgo boards. These tools help you cut, fasten, and finish the boards. When you use the correct tools, you make the job easier and get better results. Here is a list of tools you should have before you start your mgo project:
- Tape measure: You use this to measure the mgo boards and spaces.
- Pencil or marker: Mark your cut lines on the mgo surface.
- Utility knife or carbide-tipped saw: Cut the mgo boards to size.
- Power drill: Drill holes for screws in the mgo panels.
- Screwdriver or screw gun: Fasten the mgo boards to the frame.
- T-square or straight edge: Keep your cuts straight on the mgo sheets.
- Sanding block: Smooth the edges of the mgo after cutting.
- Joint knife: Apply compound to the mgo joints.
- Mixing bucket: Mix joint compound for mgo seams.
Tip: Always check your tools before you begin. Sharp blades and working drills make mgo installation faster and safer.
Safety Gear
You must protect yourself when working with mgo boards. Safety is very important at every step. Mgo dust can irritate your eyes and lungs. You should always wear the right safety gear. Here is what you need for mgo board projects:
Safety Gear | Purpose |
|---|---|
Safety glasses | Protect your eyes from mgo dust |
Dust mask or respirator | Keep mgo particles out of your lungs |
Gloves | Shield your hands from sharp mgo edges |
Ear protection | Reduce noise from cutting mgo |
Long sleeves | Cover your skin from mgo dust |
You should never skip safety steps when handling mgo. Good safety habits help you avoid injuries and keep your workspace clean. Always put on your safety gear before you touch any mgo board. If you work with others, remind them about safety too. Safety makes every mgo project better.
Surface Prep
Cleaning
Getting the surface ready is the first step before you install mgo boards. You need to focus on checking and cleaning the surface. If you skip this, your boards may not stick well or last long. Start by removing all dust, dirt, and loose debris. Pay extra attention to corners and edges. This helps you get the best bond between the mgo and the subfloor.
Studies show that different cleaning methods can change how well the mgo boards stick. Look at the table below to see how each method affects bond strength:
Cleaning Method | Effectiveness Compared to Control (24.67 MPa) | Notes | |
|---|---|---|---|
Air Particle Abrasion | 21.92 | Nearly restored to control level | Mechanical cleaning increases surface area and energy |
Ivoclean (Chemical) | 21.53 | Nearly restored to control level | High affinity for organic contaminants |
KATANATM Cleaner | 17.27 | Partial restoration | Acidic cleaner with surfactant action |
ZirCleanTM | 11.59 | Lowest performance | Alkaline cleaner, less effective |
10-MDP Primer Alone | 12.46 | Partial restoration, not enough alone | Did not survive thermal cycling |

You can see that air particle abrasion and Ivoclean work best for getting the surface ready. These methods almost bring the bond strength back to the control level. When you finish checking and cleaning the surface, you help the mgo boards stick better and last longer.
Tip: Always make sure the surface is flat and dry before you move to the next step. This will help you avoid problems later.
Leveling
Leveling is just as important as cleaning when getting the surface ready for mgo installation. You want to make sure the surface is flat and dry so the boards sit right and do not crack or move. Use a straight edge or a laser level to check for bumps or dips.
Industry guidelines give you clear benchmarks for leveling:
- No variation greater than 1/4 inch over 10 feet.
- No more than 1/16 inch difference over 1 foot.
- Use tools that measure at least 1/16 inch for distance and 0.1 degree for slope.
- Slope should not be more than 5% (1:20) for ramps or walks.
If you find any low spots, fill them with a patching compound. If you see high spots, sand them down. Always make sure the surface is flat and dry before you lay your mgo boards. This step helps you avoid gaps and keeps your mgo boards strong.
Getting the surface ready by leveling and cleaning gives you a solid base for your mgo project. When you follow these steps, you set yourself up for a smooth and lasting finish.
Planning Layout
Marking
You should mark your layout carefully before installing magnesium oxide boards. Pick the right tools first. Fine-point pencils with 5H lead draw thin, clear lines. These lines help you cut more accurately than thick pencil marks. Marking knives are also good for this job. They make sharp, shallow lines to guide your saw or knife.
Use a steel rule as your main measuring tool. This rule has tiny holes and slots for marking. Some rules show marks every 1/16 or 1/32 inch. Metric rules can mark every 1/4 millimeter. These small marks help you put your pencil or scribe in the right spot. You make fewer mistakes and get a straight edge.
Tip: Always use the same tape measure for long distances. Check it with your steel rule to keep measurements the same.
- INCRA marking rules have holes at every 1/16 and 1/32 inch for high accuracy.
- Metric rules have holes at every 1/4 millimeter.
- Combination rules use both systems for more options.
- Pocket-sized rules help you stay accurate anywhere.
Careful marking helps your installation go smoothly. You save time and avoid expensive mistakes.
Board Placement
Plan where your boards will go before you fasten anything. Good planning helps you use boards well and waste less. Many builders use Systematic Layout Planning (SLP) to organize their work. Now, you can also use digital tools like simulation software or AI to test your layout first. These tools help you find problems and fix them early.
Case studies show that using layout planning with technology brings big improvements. For example, one e-commerce center used vertical space and automation to get 99.9% order accuracy. Another company got 20% more work done with better zoning and dynamic slotting. These results show that careful planning and smart tools give better board placement and less waste.
Company Type | Planning Method | Accuracy/Improvement |
|---|---|---|
E-commerce Fulfillment | Vertical space, automation, dynamic slotting | 99.9% order accuracy, 40% more storage |
Manufacturing Distribution | ABC analysis, lean layouts | 35% faster fulfillment, 20% more productivity |
Retail Distribution | Flexible conveyors, WMS | 99.5% order accuracy, 50% faster processing |
When you plan your layout, your project is easier and looks more professional. Careful board placement means fewer mistakes and a stronger wall.
Cutting Boards
Measuring
You need accurate measurements before cutting mgo boards. Start by using a tape measure or a steel rule to check the length and width you need. High-precision tools like calipers or micrometers help you get exact numbers, especially for tight spaces. You should always double-check your marks. Measurement System Analysis helps you spot errors and keep your data reliable. Regular calibration of your tools keeps your measurements true.
Tip: Mark your mgo boards with a fine pencil or marking knife. This gives you a clear line to follow and helps you avoid mistakes when cutting mgo boards.
Stable board placement is important. Use clamps or a workbench to hold the mgo steady. This prevents slips and keeps your cuts straight. If you use a control chart or track your measurements, you can see if your process stays accurate over time. Smart sensors and digital tools can also help you get better results when cutting mgo boards.
Cutting Methods
You have several ways to cut mgo boards. The best method depends on the thickness and the finish you want. Here is a comparison of common cutting methods:
Cutting Method | Best For | Precision Level | Speed | Waste (Kerf) | Notes |
|---|---|---|---|---|---|
Laser Cutting | Thin to medium mgo | Very high | Fast | Minimal | Great for detailed shapes |
Waterjet Cutting | Thick or heat-sensitive | High | Moderate | Minimal | No heat damage to mgo |
Sawing (Manual) | Most mgo boards | Moderate | Slow | More waste | Good for simple, straight cuts |
When cutting mgo boards, always keep the board flat. Plane both sides if needed to keep it even. Square the ends with a cross-cut sled or a straight edge. For a smooth finish, sand the edges with 120, 180, and 220 grit sandpaper. You can use the pencil trick—draw lines on the edge and sand until the lines disappear—to make sure you sand evenly.
If you want a beveled edge, set your saw blade to 45 degrees and cut carefully. Use a block plane to break sharp corners and avoid tear-out. After cutting mgo boards, wipe the surface and check for rough spots. Spritz water on the edge, let it dry, then sand again with fine grit to remove raised fibers.
Note: Cutting mgo boards with the right method gives you a clean edge and a perfect fit. Always choose the method that matches your project needs.
Cutting mgo boards with care helps you get a strong, professional finish. You avoid waste and make sure each mgo board fits just right.
MGO Board Installation
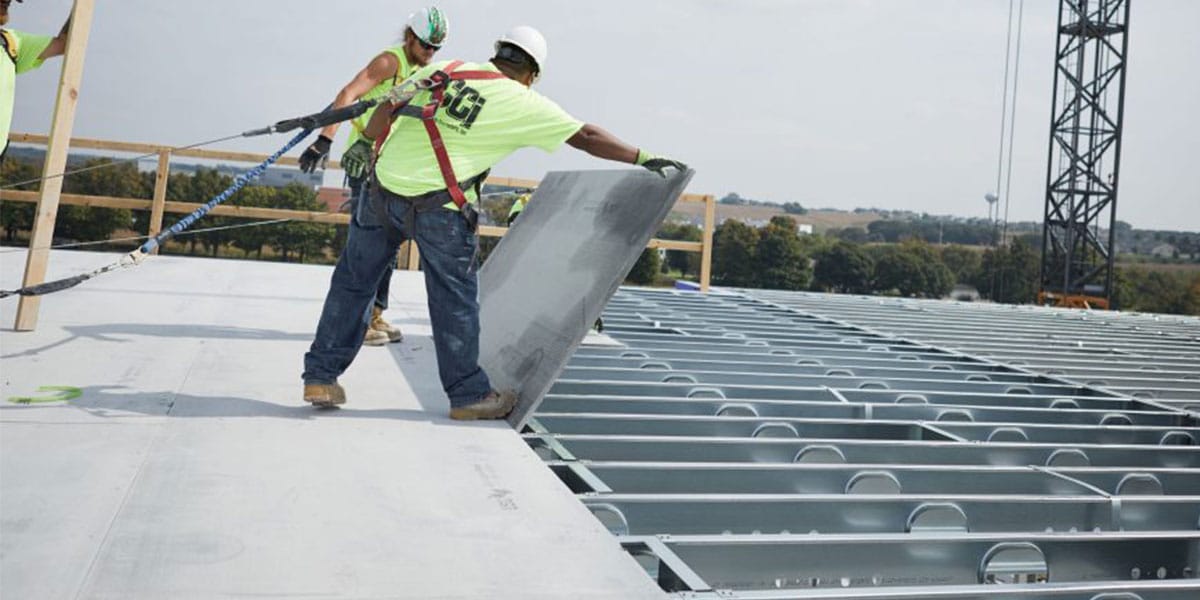 Positioning
You need to start mgo board installation by placing each board in the right spot. Lay the first board at the bottom of the wall or surface. Make sure the long edge runs along the framing. Always stagger the joints between rows. This means you do not line up the ends of the boards in one column. Staggering gives your wall more strength and helps stop cracks from spreading.
Before laying the mgo boards, let them sit at the job site for at least 24 hours. This step helps the boards adjust to the room’s temperature and humidity. Acclimatization reduces movement and stops micro-cracking later. When you lay the boards, keep a 6 mm gap at the edges where the boards meet walls or fixed elements. This space lets the boards expand and contract without damage.
Tip: Use a T-square or straight edge to check that each board lines up with the framing. This keeps your wall flat and smooth.
Fastening
After positioning, you move to fastening the boards. Use corrosion-resistant screws, such as stainless steel or phosphoric coated drywall screws. These screws last longer and do not rust. For most walls, use boards that are 10 to 12 mm thick. If you want more fire or impact resistance, choose boards up to 15 mm thick.
When fastening the boards, space your screws 8 to 12 inches apart along the edges and in the field of the board. Start fastening the boards at the center and work outward. This method helps the board stay flat and prevents bulging. Always use self-counterboring screws if you can. These screws sink into the board and make a smooth surface for finishing.
Board Thickness | Application | Screw Spacing |
|---|---|---|
8 mm | Ceilings | 8-12 inches |
10-12 mm | Standard walls | 8-12 inches |
15 mm | High-impact/fire use | 8-12 inches |
Do not overtighten the screws. If you drive them too deep, you can weaken the board. Use a power drill with a clutch to control the depth. For extra strength, you can use metal clips or strips of mgo between studs at the joints. This method helps isolate the joints from the structure and stops cracks from forming.
Note: Always follow the manufacturer’s instructions for installing mgo boards. Each brand may have special rules for fasteners and spacing.
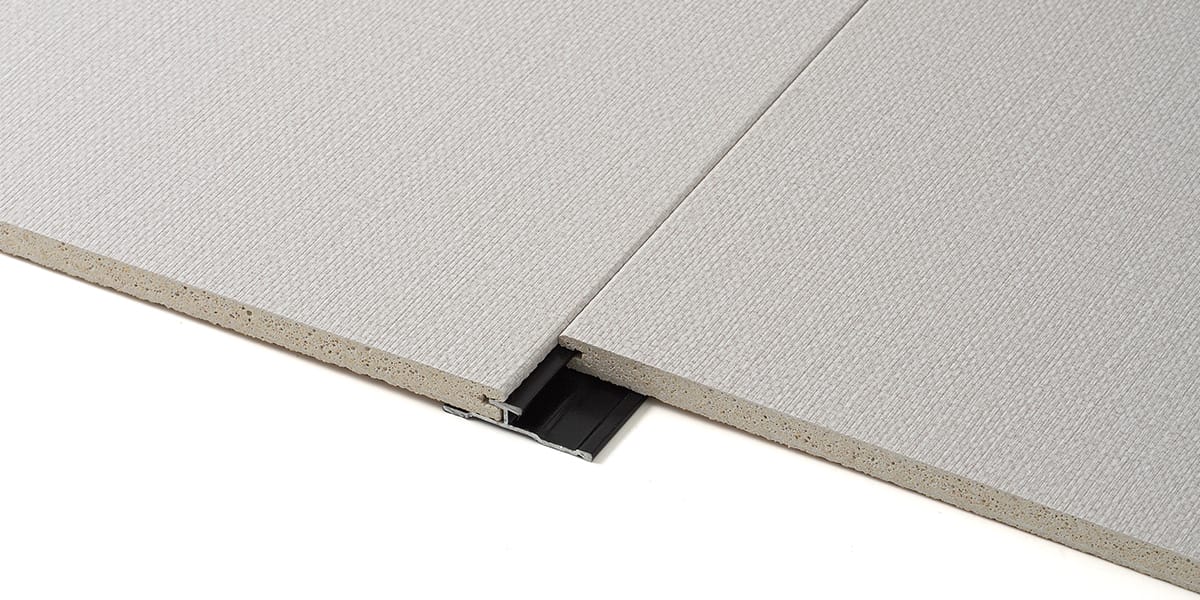
Expansion Gaps
Expansion gaps are very important in mgo board installation. You must leave a gap between each board to let them move as the temperature and humidity change. For steel framing, leave a 1/16 inch (about 1.5 mm) gap between boards. For wood framing, use a 1/8 inch (about 3 mm) gap. Fill these gaps with a non-shrinking, paintable caulking. Use a polyethylene backer rod to control the depth of the caulk.
When laying the mgo boards, always keep a 6 mm gap at the perimeter, where the boards meet walls or other fixed parts. This space helps prevent buckling or cracking if the boards expand. After you fill the gaps, apply a primer coat over the caulking. Then use spackle or plaster to hide any imperfections.
- Acclimatize boards before installation.
- Leave 3 to 6 mm between boards, filled with caulking.
- Use backer rods for deep gaps.
- Stagger all joints for strength.
- Use edge trims like aluminum or PVC for a neat finish.
Alert: Never use lightweight pre-mixed mud for joint treatment. It can absorb moisture and damage the mgo. Use self-adhesive fiberglass tape and hydraulic cement fillers for best results.
By following these steps for laying the mgo boards, fastening the boards, and leaving the right expansion gaps, you create a strong, long-lasting wall. Careful mgo board installation helps you avoid cracks, warping, and other problems in the future.
Connecting Boards
Joints
You need to connect mgo boards with strong, even joints. Good joints keep your wall flat and help stop cracks from forming. Always check the edges of each board before you join them. Clean edges make tighter seams and better connections.
Start by placing the mgo boards so the seams line up with the framing. You want the seams to land on a stud or joist. This gives support and keeps the boards from moving. Use a tape measure to check that the seams are straight. If you see gaps, adjust the boards until the seams touch but do not press too hard. Leave a small gap for movement.
Manufacturers give you the best advice for screw spacing and expansion gaps. You will not find one rule for every job. Each mgo board brand has its own instructions. These instructions depend on the type of material, the width of the board, and the climate. Most guides suggest you leave an expansion gap between 1/8 inch and 1/4 inch at the seams. Some jobs may need up to 3/8 inch if the weather changes a lot. Always use the fastener type and length that the manufacturer recommends. This keeps the seams tight and the joints strong.
Tip: Never skip the expansion gap at the seams. If you forget this step, the mgo boards can buckle or crack when the weather changes.
When you fasten the boards, start at the center of each seam and work outward. This helps the joints stay flat. Use screws every 8 to 12 inches along the seams. Do not overtighten the screws. If you drive them too deep, you can weaken the joints and damage the mgo.
Here is a quick checklist for connecting mgo board joints:
- Check that all seams land on framing.
- Leave the right expansion gap at the seams.
- Use the correct screw spacing along the joints.
- Start fastening at the center of each seam.
- Do not overtighten screws.
A strong joint means your wall will last longer and look better. You will also have fewer problems with cracks at the seams.
Corners
Corners need extra care when you connect mgo boards. You want the seams at the corners to line up neatly. This helps the wall look smooth and keeps the corners strong.
Begin by planning how the mgo boards will meet at the corner. Stagger the seams so they do not all end at the same spot. This makes the corner joints stronger. Cut the boards so the seams fit tightly but still leave a small expansion gap. Use a square to check that the boards meet at a true 90-degree angle.
Fasten the boards at the corner with screws spaced 8 to 12 inches apart. Make sure the screws go into the framing behind the corner. This holds the seams tight and keeps the joints from moving. If you have an outside corner, you can use a metal or PVC corner bead. This bead covers the seams and protects the edge from damage.
Note: Always follow the mgo board manufacturer’s instructions for corners. Some brands may want you to use special tape or compound at the corner seams.
After you fasten the boards, check the seams at the corner for gaps. Fill any small gaps with a non-shrinking caulk. This keeps water and air out of the joints. When you finish, the seams at the corners should look even and feel smooth.
A well-built corner gives your wall a clean look and strong support. You will see fewer cracks at the seams and joints if you take your time at this step.
Joint Treatment
Tape and Compound
You need to treat all seams and joints to make your wall strong and smooth. Start by placing self-adhesive fiberglass tape over every seam. This tape helps hold the boards together and stops cracks from forming. When you use tape and compound together, you get a finish that lasts. Studies show that using tape with other treatments can reduce pain and improve function in medical settings. In building, tape works the same way by reducing stress on seams and making the wall more durable.
Next, apply a joint compound over the tape. Use a joint knife to spread the compound in a thin, even layer. Make sure you cover all seams and joints. The compound fills gaps and creates a smooth surface. Research shows that the right adhesive compound, combined with good surface prep, makes the joints much stronger. You should let the compound dry fully before moving to the next step.
Tip: Always follow the manufacturer’s instructions for treating joints and seams. This helps you avoid problems later.
Sanding
After the compound dries, you need to sand the seams and joints. Sanding makes the surface flat and ready for paint or primer. Use 240 grit sandpaper for the best results. Studies show that 240 grit gives the right balance between smoothness and bonding strength. If you use sandpaper that is too coarse, you can weaken the joint. If you use sandpaper that is too fine, the compound may not bond well.
Sanding Method (Grit Size) | Surface Roughness (µm) | Max Load Increase (%) | Fracture Energy Increase (%) | Failure Mode | Notes |
|---|---|---|---|---|---|
Degreased (No sanding) | ~0.56 | Baseline | Baseline | Adhesive Failure | Smoothest, but weakest bond |
800 | Intermediate | Not specified | +35% | N/A | Less optimal than 240 grit |
240 (Optimal) | ~1.0-1.5 | +38% | +55% | CSF | Best for treating joints and seams |
60 (Coarse) | ~2.3 | -32% | -19% | Adhesive Failure | Too rough, weakens joint |

Wipe away dust after sanding. Check the seams for any low spots or rough areas. If you find any, add more compound and sand again. Careful sanding gives you a smooth, strong finish that will last.
Priming and Painting
Priming
You need to prime magnesium oxide boards before you paint. Primer helps paint stick better and makes the surface smoother. When you choose a primer, look for one that fills small pores and blocks moisture. Research shows that epoxy resin primers work well because they fill pores and keep water out. Alkyd fillers give strong adhesion, while two-component polyurethane primers with more solids fill gaps best. These choices help your wall last longer and look better.
To apply primer, use a roller or brush. Start at the top and work down. Cover the whole board with a thin, even coat. Let the primer dry fully before you move to the next step. If you want a smoother finish, sand the surface lightly after the primer dries.
Tip: Always follow the primer label for drying times. A good primer stops stains and keeps the paint from peeling.
Painting
After priming, you can paint the boards. Pick a high-quality acrylic or latex paint for the best results. These paints resist moisture and give a strong finish. Use a roller for large areas and a brush for corners or edges. Paint in thin layers. Let each layer dry before adding another. This method gives you a smooth, even color.
A table can help you choose the right paint:
Paint Type | Best For | Durability | Finish |
|---|---|---|---|
Acrylic Latex | Interior walls | High | Matte/Satin |
Epoxy | Wet areas | Very High | Gloss |
Alkyd | High-traffic | High | Semi-gloss |
If you want to finish the wall with a bold color, test a small spot first. This step helps you see how the paint looks when dry.
Sealing
Sealing adds extra protection to your wall. A clear sealer keeps out water and dirt. It also helps the color stay bright and the surface easy to clean. Research shows that sealing can lower surface energy a bit, but it makes the wall more durable and keeps the finish looking new. Use a water-based or polyurethane sealer for best results. Apply it with a clean roller or brush. Let it dry fully before you touch the wall.
Note: Sealing is important in kitchens, bathrooms, or other damp places. It helps your wall resist stains and damage.
Final Steps
Inspection
You should always inspect your magnesium oxide board installation before you finish the project. Careful inspection helps you catch small problems early. Use a checklist to make sure you do not miss any steps. Industry guidelines recommend the following inspection process:
- Check each board for warping or bending. Boards should stay flat and strong.
- Measure the wall or surface to confirm it matches your planned dimensions.
- Look at all joints and seams. Make sure there are no cracks, gaps, or uneven spots.
- Inspect screw heads and fasteners. They should sit flush with the board, not sticking out or sunk too deep.
- Use good lighting and, if possible, a magnifying tool to spot small defects.
- Compare your work to a sample or reference board if you have one.
- Document any issues you find. Take notes or photos for your records.
- Review the entire area for surface defects like scratches, dents, or pinholes.
Tip: Take your time during inspection. A careful check now saves you from costly repairs later.
Maintenance
Magnesium oxide boards need very little maintenance, but a few simple steps will help your installation last for decades. Long-term studies show that these boards resist moisture, fire, and pests without extra treatments. You can follow these strategies to protect your investment:
- Use chloride-free boards in damp areas like bathrooms or basements. These boards resist corrosion and rust, even after years of moisture exposure.
- Clean the surface with a soft cloth and mild soap. Avoid harsh chemicals that could damage the finish.
- Check for signs of mold or mildew, especially in wet rooms. Magnesium oxide boards naturally resist mold, but regular checks keep your space healthy.
- Inspect for cracks or chips after heavy impacts. Repair small damage quickly to prevent bigger problems.
- Avoid painting or sealing with products not recommended by the manufacturer.
Note: Magnesium oxide boards can last up to 100 years with proper care. Their strength and moisture resistance mean you spend less time and money on repairs.
You now know the key steps for finishing and connecting magnesium oxide boards. Careful surface prep, correct joint treatment, and using the right fasteners all help you build a strong, long-lasting wall. Projects that follow each step see fewer cracks and better durability. Take your time and check your work at every stage. Patience and attention to detail make your results look professional.
Have questions or want to share your experience? Leave a comment below!
FAQ
How do you cut magnesium oxide boards without chipping?
You should use a carbide-tipped saw or a sharp utility knife. Clamp the board for stability. Cut slowly and follow your marked line. Sand the edges after cutting for a smooth finish.
Can you use regular drywall screws for magnesium oxide boards?
No, you need corrosion-resistant screws. Stainless steel or phosphoric coated screws work best. These prevent rust and hold the boards securely. Always check the manufacturer’s recommendations.
Do you need to seal magnesium oxide boards in wet areas?
Yes, you must seal the boards in bathrooms or kitchens. Use a water-based or polyurethane sealer. This protects the boards from moisture and keeps them strong.
What is the best way to clean finished magnesium oxide boards?
Wipe the surface with a soft cloth and mild soap. Avoid harsh chemicals. For tough stains, use a damp sponge. Magnesium oxide boards resist mold, so regular cleaning keeps them looking new.
Can you paint directly on magnesium oxide boards?
Tip: Always apply a primer before painting. Primer helps the paint stick and gives a smooth finish. Choose a high-quality acrylic or latex paint for best results.