

22 Jul How to Insulate a Subfloor Step by Step for Maximum Efficiency
Table of Contents
If you want to stop drafts and save on energy bills, start by installing insulating subfloor materials in your home. Up to 10% of your home’s heat can escape through the floor if you skip this important insulating subfloor step. When you seal gaps, choose the right insulating subfloor insulation, and follow a clear process, you help keep your home warmer in winter and cooler in summer. Insulating subfloor spaces works for both regular floors and crawl spaces, and you can tackle this project yourself with some basic tools.
Key Takeaways
Close all holes and cracks near the subfloor rim joists before you put in insulation. This helps stop cold air, water, and bugs from getting in.
Pick insulation with the right R-value and that can handle water. Use foam board in wet places. Use mineral wool if you want less noise and more fire safety.
Measure and cut the insulation so it fits tightly between the joists. Do not leave spaces or squish the insulation, or it will not work well.
Put a vapor barrier on top of the insulation. Seal all the seams and edges to keep water out and save energy.
Check your insulation often for damage or water. Fix any problems fast to keep your home comfy and your bills low.
Preparation
Inspect Rim Joists
Start your project by checking the rim joists around your subfloor. These are the boards that run along the edge of your floor framing. Look closely for any cracks, gaps, or holes. If you spot any, grab some spray foam or foam board and seal them up. This step keeps cold air, moisture, and even pests from sneaking in. You want a tight seal before you move on to insulation installation.
Tip: Use closed-cell spray foam for small gaps and cut foam board for larger spaces. Press the foam board in place and seal the edges with caulk or more spray foam.
Sealing these areas now will make your insulation installation much more effective. You’ll notice fewer drafts and better comfort in your home.
Clean and Measure
A clean workspace makes the whole installation process smoother. Start by removing all dust, dirt, and debris from the subfloor. Use a vacuum, broom, or even a damp mop. If you see any sticky spots, paint, or old glue, scrape or sand them away. For tough spots, try a mild solvent or adhesive remover. Make sure the area is dry before you continue.
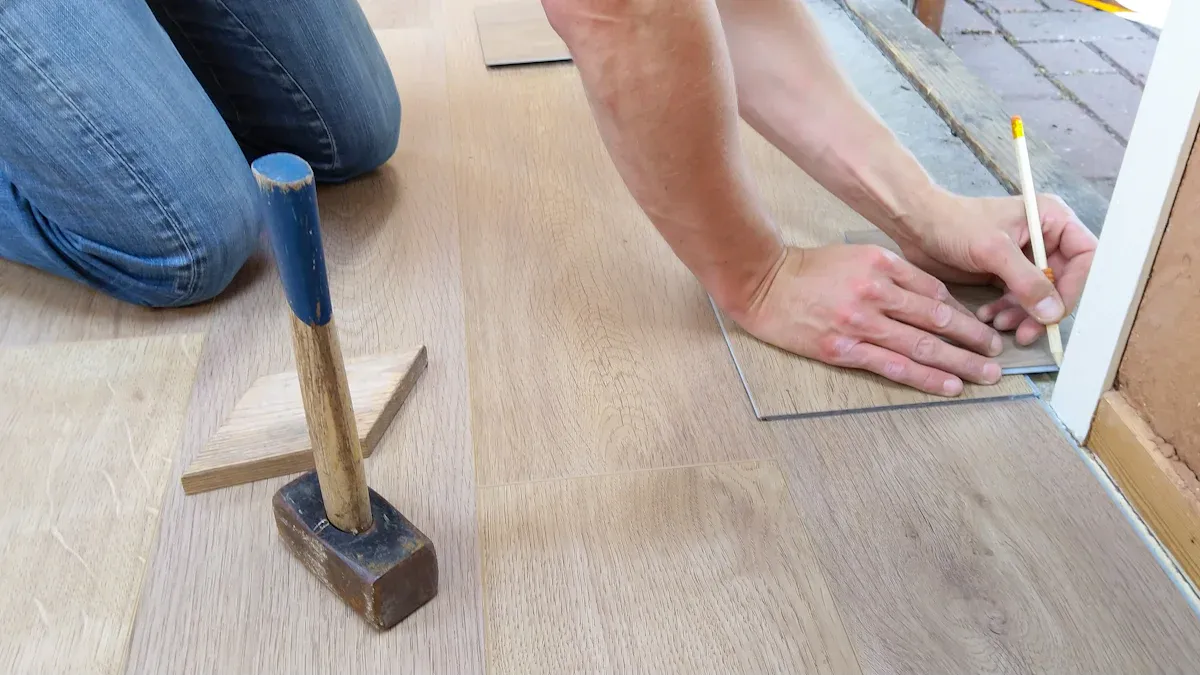
Now, grab your tape measure. Measure each subfloor cavity carefully. Double-check your numbers to avoid gaps that can hurt your insulation’s performance. Mark your insulation pieces with a bright marker or chalk so you can see your lines. Lay the insulation flat on a clean surface, like a table or a sheet of plywood. Use a straightedge to guide your cuts. For fiberglass batts, use a sharp utility knife and cut in one smooth motion. For foam board, press firmly and cut in one pass. Always wear gloves, goggles, and a dust mask to protect yourself.
Note: Don’t rush this part. Careful measuring and cutting mean your insulation will fit snugly, making your installation last longer and work better.
Materials and Tools
Insulation Types
There are a few good ways to insulate your subfloor. Most people use panels made of foam and wood together. These panels help keep floors warm and dry. The most common kind uses closed-cell polystyrene foam. This foam keeps out water and holds in heat. Some brands add things like air gaps or drainage. These features help stop dampness.
Here’s a quick look at popular subfloor insulation materials:
Insulation Material / Brand | Description | Typical Thickness | R-Value Range | Key Features |
|---|---|---|---|---|
Amdry | Insulated subfloor panels with OSB and closed-cell polystyrene foam (XPS) | ~1.25 inches (can be thicker) | Highest R-values, supports various floor types, includes ventilation and drainage for moisture control | |
Dricore Insul-Armor | OSB with 100% inorganic EPS foam insulation | ~1.25 inches | R3.0 to R4.1 | Easy tongue-and-groove installation, Air Gap technology for moisture barrier, strong load support |
Barricade | OSB with closed-cell polystyrene foam insulation | 1.25 inches | R1.4 (standard), upgraded to R3.2 | Tongue-and-groove panels, no glue needed, basic to moderate insulation |
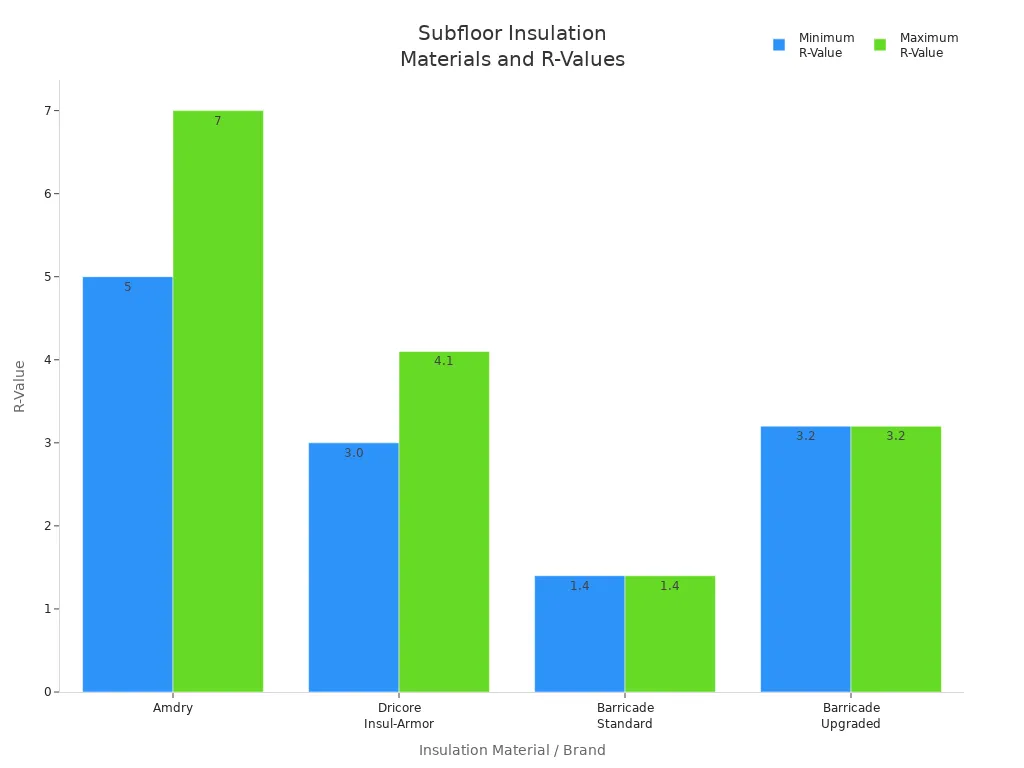
When you choose insulation, look at the R-value. A higher R-value means it blocks more heat. Pick an R-value that fits your weather and your house. Good insulation helps your project work better. It can also help you spend less on energy bills.
Tools Needed
You do not need special tools for this job. Most of these tools are common and easy to find. Here is what you need:
Tape measure for accurate sizing
Straight edge or T-square to guide your cuts
Soft-fiber saw or insulation knife (like Bahco, Custom TimberBatt, or Linzen) for clean cuts
Putty knife to press insulation edges flush with the joists
Tip: Wear gloves and goggles when you install insulation. Safety gear keeps you safe and comfortable while you work.
With the right materials and tools, your job will go smoothly. Planning ahead helps you get a strong and lasting result.
Insulating Subfloor
Install Foam Board
You want your home to stay warm and dry, right? Start by installing foam board insulation under your subfloor. Foam boards work great for insulating subfloor areas because they block heat loss and keep moisture out. Polyiso rigid foam boards give you the highest R-value per inch, usually between 5.6 and 8. That means you get more insulation power in less space. These boards also resist water, so they last longer in damp spots like basements or crawl spaces.
To begin, measure and cut each foam board so it fits snugly between the joists. Press the boards tightly into place. For the best results, run a continuous layer of foam board across the underside of the joists. This step helps stop thermal bridging, which is when heat sneaks through the wood. After you fit the boards, tape all the seams with high-quality tape. If you use foil-faced boards, foil tape works best. For the edges and any small gaps, use spray foam or caulk to seal them up tight. This keeps air from leaking in or out.
Tip: Protect your foam board by covering it with OSB or drywall if the area gets a lot of foot traffic or if you want extra durability.
Here’s a quick comparison of foam board and fiberglass batts for insulating subfloor spaces:
Insulation Type | R-Value per Inch | Moisture Resistance | Best Use |
|---|---|---|---|
Polyiso Foam Board | 5.6 to 8 | Excellent | Damp/cold environments |
Fiberglass Batts | 2.8 to 3.9 | Poor | Dry, above-grade floors |
You can see that foam board outperforms fiberglass in both thermal resistance and moisture control. That’s why many pros recommend foam board for subfloor insulation.
Add Batts Between Joists
If you want another layer of protection, add batts between the joists. You can choose between fiberglass and mineral wool batts. Mineral wool gives you a higher R-value and better soundproofing. It also resists fire and water, making it a smart choice for insulating subfloor areas. Fiberglass batts cost less and are easy to find, but they don’t block moisture as well and can lose their shape over time.
Here’s a table to help you decide:
Feature | Mineral Wool Batts | Fiberglass Batts |
|---|---|---|
R-value per inch | Higher | Lower |
Moisture Resistance | Excellent | Poor |
Fire Resistance | Excellent | Good |
Cost | Higher | Lower |
Soundproofing | Superior | Basic |
Cut the batts to fit snugly between the joists. Push them in gently so they fill the space without getting squished. If you compress the batts, you lower their R-value. For the best insulating subfloor results, make sure there are no gaps or spaces. Mineral wool is stiffer, so it stays in place better and doesn’t sag.
Note: Always wear gloves, goggles, and a mask during installation. Both fiberglass and mineral wool can irritate your skin and lungs.
Seal Edges and Gaps
You’ve installed your foam board and batts, but you’re not done yet! Sealing every edge and gap is the secret to a draft-free floor. Use caulk or expanding spray foam to fill all the cracks around the insulation. Pay special attention to the rim joists and corners. Even small gaps can let in cold air and moisture, which lowers your insulation’s effectiveness.
Follow these steps for a tight seal:
Seal all edges and gaps with caulk or spray foam.
Lay a vapor barrier (like polyethylene sheeting) over the insulation. This keeps moisture from getting in.
Overlap the vapor barrier edges by at least 6 inches and seal the seams with vapor barrier tape.
Extend the vapor barrier a few inches up the walls for extra protection.
Double-check that the insulation sits tight against the joists, with no air pockets.
Tip: If you skip sealing, you risk losing heat and letting in moisture. Take your time with this step for the best results.
A vapor barrier is key for keeping your insulation dry and long-lasting. In cold climates, put the vapor barrier on the warm side of the insulation. In hot, humid places, it goes on the outside. Always cover the entire area and seal every seam.
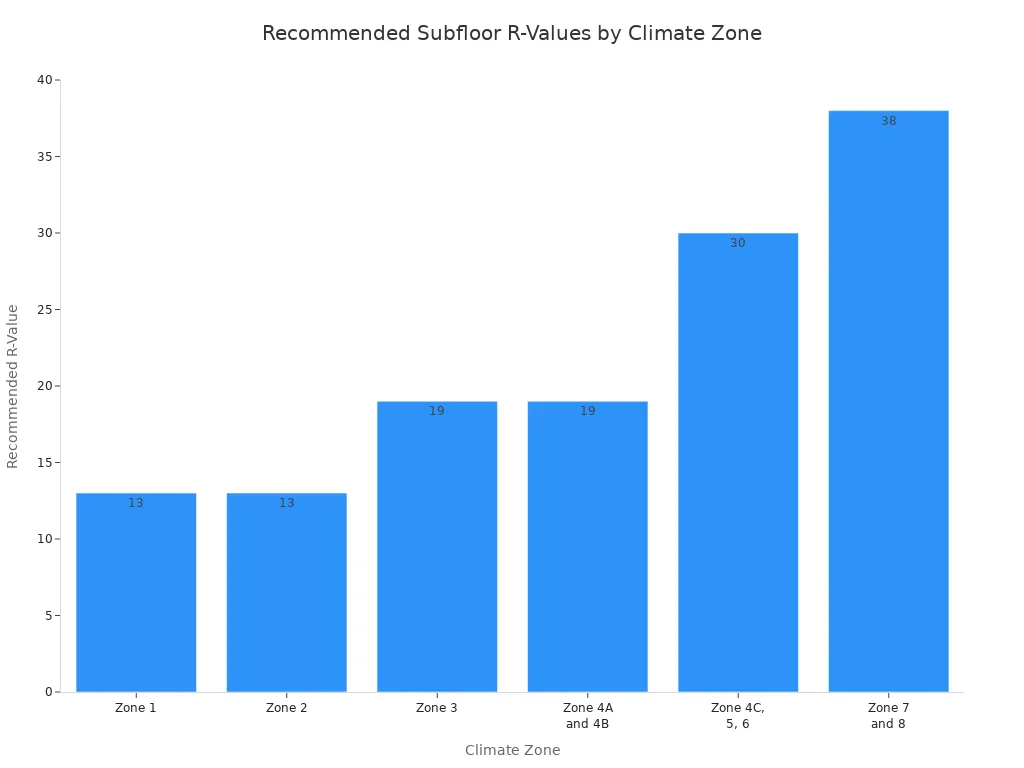
When choosing your insulation, check the recommended R-value for your climate zone. Here’s a quick guide:
Climate Zone | Recommended Floor R-Value for Subfloor Insulation |
|---|---|
1 | R13 |
2 | R13 |
3 | R19 |
4A and 4B | R19 |
4C, 5, 6 | R30 |
7 and 8 | R38 |
Pick the right R-value for your area to get the most out of your insulating subfloor project. The right installation and sealing steps help you save energy and keep your home comfortable all year.
Remember: Insulating a floor is more than just stuffing in some batts. Careful installation, sealing, and vapor barrier placement make all the difference for long-lasting comfort and savings.
How to Insulate a Crawl Space
When you want to know how to insulate a crawl space, you need to focus on two main things: stopping moisture and keeping heat inside your home. Crawl space insulation is different from regular subfloor insulation. In a crawl space, you deal with ground moisture and outside air, so you need a special approach. Let’s break down the steps for the best results.
Vapor Barrier
Start with vapor barrier installation on the crawl space floor. This step keeps ground moisture from rising and causing problems like mold or wood rot. The best material for this job is thick, reinforced polyethylene plastic. Choose at least 10-mil or even 20-mil for extra strength. Lay the plastic flat across the entire crawl space floor. Overlap the seams by 6 to 12 inches and seal them with vapor tape or butyl tape. Run the barrier a few inches up the foundation walls and secure it tightly.
Tip: Never staple the vapor barrier to the floor joists. This traps moisture and can damage your wood. Always seal the barrier to the ground and walls.
A good vapor barrier keeps your crawl space insulation dry and long-lasting. It also helps control humidity, which protects your home’s structure.
Foundation Wall Insulation
After you finish the vapor barrier, focus on the crawl space walls. For most homes, insulating the foundation walls works better than insulating the crawl space ceiling. This method turns your crawl space into a conditioned area, which helps your heating and cooling system work better. Use rigid foam board or closed-cell spray foam for the best crawl space insulation. These materials resist moisture and keep their shape over time.
Here’s a quick table to help you follow building code rules for crawl space insulation:
Requirement | Details |
|---|---|
Vapor Retarder | |
Wall Insulation | Rigid foam or spray foam, fire-protected |
Drainage | Sump pump or drains away from foundation |
Access Door Size | At least 18″ x 24″ |
Seal all gaps and cracks in the walls before you install insulation. This step stops drafts and keeps pests out. If you have ducts or pipes in the crawl space, insulate them too. Good crawl space insulation lowers your energy bills and keeps your floors warmer.
Note: Don’t insulate the crawl space ceiling. Focus on the perimeter and the subfloor for the best results.
If you want to know how to insulate a crawl space for maximum efficiency, remember these steps: install a strong vapor barrier, insulate the foundation walls, and seal every edge. Crawl space insulation protects your home from moisture, saves energy, and makes your living space more comfortable.
Tips and Mistakes
Tips for Efficiency
You want your insulation project to last and work well, right? Here are some smart ways to get the most out of your work:
Always check your crawl space for moisture, mold, or damage before you start. Fix any problems first so your insulation stays dry and strong.
Pick insulation with the right R-value and moisture resistance for your space. Not all materials work well for crawl space insulation, so choose carefully.
Control moisture by sealing cracks and gaps. Use a vapor barrier that goes up the walls and seals tightly. This keeps water out and helps your insulation last longer.
Secure your insulation with supports or adhesive. This stops it from sagging or falling, which keeps your home warmer.
Seal every air leak around pipes, vents, and doors. Spray foam or caulk works great for this job.
Check your insulation every year. Look for damage or wet spots. Fix anything you find right away to keep your energy bills low.
Tip: Clean your subfloor often. Sweep or vacuum to keep dirt and debris away. Use gentle cleaners, especially if you have eco-friendly panels. Place rugs or pads under furniture to protect your work.
If you follow these steps, insulating a floor becomes much easier and more effective. You will notice warmer rooms and lower energy costs.
Common Mistakes
Many people make the same errors when working on crawl space insulation. These mistakes can lead to big problems later. Here’s a table showing what to watch out for:
Mistake | What Happens |
|---|---|
Not cleaning or drying the subfloor | Insulation won’t stick, floors may shift or crack |
Ignoring moisture levels | Mold, mildew, or floor swelling |
Using the wrong materials | Insulation may fail or not last |
Leaving gaps or compressing insulation | Cold spots and wasted energy |
Skipping vapor barriers | Moisture gets in, causing damage |
Not sealing air leaks | Air escapes, energy bills go up |
Not enough space for insulation | Lower R-value, less comfort |
Note: Gaps and leaks let warm or cool air escape. Moisture can ruin insulation and cause mold. Always seal and check your work to avoid these problems.
If you avoid these mistakes, your crawl space insulation will protect your home and save you money for years.
You’ve learned that every step matters when you insulate your subfloor. Sealing gaps and picking the right insulation keep your home warmer, block pests, and help you save up to 10% on energy bills.
Experts say sealing is even more important than just using high R-value materials.
Good insulation and air sealing protect against mold, drafts, and heat loss for years.
Remember, always check for gaps and think about adding ventilation. This keeps your air fresh and your home comfortable all year.
FAQ
How do I know if my subfloor needs insulation?
You might notice cold floors, higher energy bills, or drafts. If you see gaps or feel chilly air near the floor, your subfloor probably needs insulation. Check for moisture or mold, too. These signs mean you should insulate soon.
Can I install subfloor insulation myself?
Yes, you can! Most DIYers handle this project with basic tools. Just follow each step, measure carefully, and wear safety gear. If you feel unsure, ask a friend for help or check online videos.
What is the best insulation for a crawl space?
Rigid foam board works best for crawl spaces. It resists moisture and keeps its shape. You can also use closed-cell spray foam. Always add a vapor barrier on the ground to stop moisture.
Do I need a vapor barrier under my subfloor?
Yes, you do. A vapor barrier keeps moisture out of your insulation and subfloor. It helps prevent mold and wood rot. Always seal the seams and run the barrier up the walls for extra protection.
How often should I check my insulation?
Check your insulation once a year. Look for wet spots, gaps, or damage. If you find problems, fix them right away. This keeps your home warm and your energy bills low.