


15 Dec Beginner’s Guide to Basement Subfloor Insulation
Table of Contents
You want to insulate a basement subfloor, but you might not know how to begin. Keeping water away is very important. Choose materials that block water and keep the floor dry. Seal every gap and crack before you put down insulated subfloor panels. Many beginners have trouble with water, bumpy floors, and lining up panels. If you pay attention to these steps, you will do a good job.
Key Takeaways
First, check your basement for any water problems. Look for water stains and musty smells. Use moisture meters to find hidden wet spots.
Seal every gap and crack before you add insulation. Use caulk for small cracks. Use spray foam for bigger gaps. This helps keep water out.
Pick the right insulation materials like MgO boards or insulated subfloor panels. These choices fight moisture and give strong support.
Put in a vapor barrier to stop water from hurting your insulation. Use plastic sheeting or closed-cell spray foam for good protection.
Check your basement often for wet spots or mold. Finding problems early keeps your space dry and comfy.
Why Basement Subfloor Insulation Matters
Benefits Of Basement Subfloor Insulation
You may ask why basement subfloor insulation is important. Insulating your basement subfloor does more than warm up the floor. It helps you save money and makes your home feel better. Here are some ways insulation helps:
It keeps heat inside, so your heater works well.
Your rooms stay at a steady temperature, which feels good.
Insulation works as a vapor barrier and controls moisture.
You get cleaner air because insulation stops mold and lowers humidity.
Studies show heat loss from basements can waste energy in your house. Adding insulation makes your home use energy better and stops problems like mold and damage. You also make your living space healthier and more comfortable. Insulation protects you from cold floors and helps keep your basement dry.
Risks Of Poor Insulation Or Waterproofing
If you skip insulation or choose the wrong kind, you can have big problems. Here’s what might happen:
Mold can grow if moisture gets trapped, which can make you sick.
Cold floors in the basement make it uncomfortable.
Pipes can freeze and burst, causing water damage.
Ducts without insulation let in cold air and raise bills.
Water damage gets worse without good protection.
Here are some numbers about mold and moisture damage in basements with poor insulation:
Statistic | Value |
|---|---|
Percentage of U.S. homes with visible mold | 47% |
Asthma cases linked to dampness and mold | 21% |
Annual healthcare costs tied to mold issues | $5.6 billion |
Asthma cases attributed to mold exposure | 4.6 million |
Tip: Always check for moisture before you start. Good moisture control and the right insulation keep your basement safe and dry.
Basement Moisture Inspection And Preparation
Before you start any basement subfloor preparation, you need to stop moisture from causing problems. If you skip this step, you risk moisture damage, mold, and a cold, damp basement. Let’s break down how you can get your space ready for insulation.
Checking For Moisture Issues
You want to spot dampness before it becomes a big problem. Start by looking for signs like water stains, musty smells, or cracks. You can use special tools to check for hidden moisture. Here’s a quick guide:
Inspection Method | Description |
|---|---|
Visual Clues | Look for water stains, musty odors, mold, and cracks. |
Detection Tools | Use moisture meters, infrared cameras, and hygrometers. |
Common Causes | Identify issues like poor drainage, foundation cracks, and plumbing leaks. |
Timeline for Mold Growth | Mold can begin growing within 24-48 hours in water-damaged areas. |
Some handy tools include pin-type meters for wood, pinless meters for drywall, and combination meters for all surfaces. You can also try the Wagner Meters’ C555 or Rapid RH L6 Testing System for concrete. Infrared moisture meters help you find hidden wet spots fast.
Tip: Mold grows quickly. Always check for leaks or wet spots before you move on.
Sealing Gaps And Cracks
You need to seal every gap and crack to keep out water and improve moisture control. Use caulk for small cracks (¼ inch or less) and spray foam for bigger gaps. Don’t forget to seal holes for wires or pipes. Pay close attention to the rim joists and where the wall meets the floor. Start with caulk, then add spray foam for extra protection. This step helps your raised moisture barrier work better.
Cleaning And Leveling The Subfloor
A clean, flat surface helps insulation stick and last longer. Here’s what you should do:
Remove dust, debris, and old glue with a vacuum and damp mop.
Check the floor with a long level. Fill low spots with leveling compound.
Make sure the surface is smooth before you install anything.
“A clean subfloor is one that’s free of debris, contaminants, and any residue that could interfere with the flooring installation process.”
When you follow these steps, you set yourself up for a dry, warm basement that stays comfortable year-round.
Choosing Basement Subfloor Insulation Materials
 Picking the right subfloor material is important. It helps keep your basement dry and warm. It also keeps your space safe. Let’s look at some good choices and see how they compare.
MgO Board And Insulated Subfloor Panels
MgO boards work well in basements. They resist moisture and give strong support. MgO does not swell or warp when wet. It stays solid in humid places. You can use MgO in bathrooms, kitchens, and basements. It does not bend or break down from rain or humidity. If you want a tough basement subfloor, MgO boards are a smart choice.
Insulated subfloor panels are also a good option. They give insulation and strength together. You can find panels made from XPS, EPS, or polyiso. These panels keep heat inside and block moisture. You get a strong base for your insulated floor boards.
Here’s a chart that shows how MgO compares to other boards:
Feature | MGO Floor Board | Plywood | Cement Board | OSB |
|---|---|---|---|---|
Moisture Resistance | High | Low | Medium | Low |
Structural Strength | High | Medium | High | Low-Medium |
Waterproofing Barriers And Drainage Options
You need a good barrier to keep water out. Waterproofing choices include vapor barriers, plastic sheets, and special coatings. These stop water from getting into your insulated subfloor panels and insulated floor boards.
Interior drainage systems help move water away from your basement. They lower the risk of flooding. You get protection from water damage and save money compared to outside waterproofing. But these systems can be hard to install and need regular checks. Sometimes, they do not fix the main source of leaks.
Advantages | Disadvantages |
|---|---|
Reduces risk of flooding | Installation can be disruptive |
Protects from water damage | May not address exterior water issues |
Less costly than exterior | Requires regular maintenance |
Tip: You can put in interior waterproofing any time of year. You will see results quickly.
Essential Tools For Installation
You want to make your work easier. Here are tools you need for installing insulated subfloor panels and insulated floor boards:
Tape measure
Utility knife
Straight edge
Hammer or drill
Caulk gun
Moisture meter
Level
Safety gear (gloves, mask, goggles)
You use these tools to cut panels, check for moisture, and seal every barrier. Make sure you have all your tools before you start.
Here’s a chart that shows the R-values for popular insulation materials:
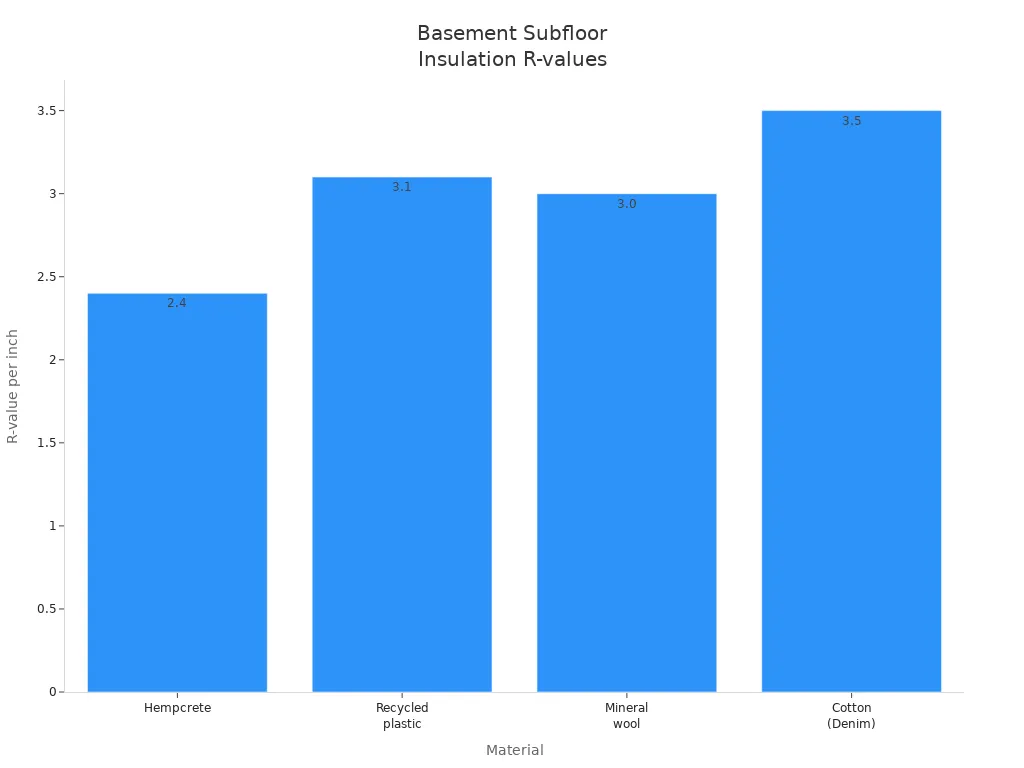
You can see polyiso rigid boards and closed-cell spray foam have the highest R-values. Hempcrete and fiberglass batt have lower R-values but may work for some projects. Always pick insulation that fits your basement needs.
Basement Subfloor Insulation Steps
You want your basement subfloor to stay dry and warm. Good subfloor insulation starts with careful installation. Let’s walk through each step so you can get the best results.
Installing Vapor Barriers
Vapor barrier installation is the first thing you need to do. This step keeps moisture from sneaking into your subfloor insulation. You can use plastic sheeting, foil, or closed cell spray foam insulation. Each type works well for different needs. Here’s a quick look at your options:
Description | |
|---|---|
Plastic sheeting | Commonly used, effective in blocking vapor. |
Foil | Reflective properties, helps in reducing moisture. |
Closed cell spray foam insulation | Provides insulation and acts as a vapor barrier. |
You want to follow these steps for vapor barrier installation:
Check plumbing and utility spots. Make sure the subbase is ready for installation.
Roll out the vapor barrier to cover the whole area. Overlap seams and tape them down.
Seal the perimeter at all edges. This stops vapor from moving around.
Seal around pipes and wires with tape or patches.
Fix any damage you see. Keep the barrier strong.
Tip: Overlap seams by at least 6 inches and use waterproof tape for extra moisture control.
Laying Insulated Subfloor Panels
Now you can start laying insulated subfloor panels. This step gives your basement the thermal protection it needs. You want to pick panels that fit your climate and moisture needs. Polyiso foam board works best in damp or cold places. Fiberglass batts are better for dry, above-grade floors.
Insulation Type | R-Value per Inch | Moisture Resistance | Best Use |
|---|---|---|---|
Polyiso Foam Board | 5.6 to 8 | Excellent | Damp/cold environments |
Fiberglass Batts | 2.8 to 3.9 | Poor | Dry, above-grade floors |
You want to maximize thermal performance with these steps:
Seal all edges and gaps with caulk or spray foam before you lay panels.
Place a vapor barrier over the insulation. Polyethylene sheeting works well.
Overlap the vapor barrier edges by at least 6 inches. Seal seams with vapor barrier tape.
Extend the vapor barrier a few inches up the walls for extra waterproof protection.
Make sure the insulation sits tight against the joists. No air pockets allowed.
You can see how climate zones affect recommended R-values for subfloor insulation:
Climate Zone | Recommended Floor R-Value for Subfloor Insulation |
|---|---|
1 | R13 |
2 | R13 |
3 | R19 |
4A and 4B | R19 |
4C, 5, 6 | R30 |
7 and 8 | R38 |
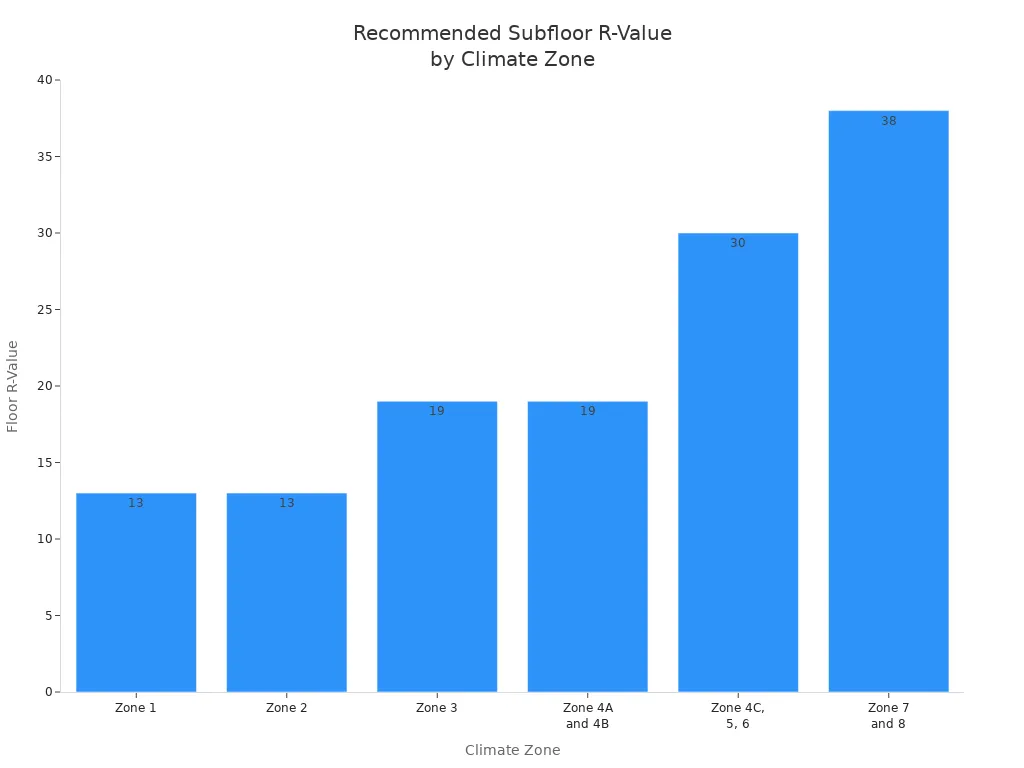
Note: Higher R-values mean better insulation. Pick the right panels for your climate.
Sealing Joints And Edges
You want to finish strong by sealing joints and edges. This step keeps moisture out and makes your subfloor insulation last longer. Here’s how you do it:
Prepare the surface. Remove debris and sharp objects so nothing pokes through the barrier.
Lay polyethylene sheets flat. Overlap seams by 6 to 12 inches. Seal seams and edges with waterproof tape.
For liquid membranes, apply the coating evenly. Let it cure as the product says.
Inspect the barrier. Look for gaps, wrinkles, or punctures. Fix any problems right away.
“A well-sealed subfloor keeps water out and helps your insulation work better.”
You want to check every edge and joint. Good sealing means your basement stays dry and comfortable. You get better moisture control and a longer-lasting installation.
Now you know the steps for basement subfloor insulation. You can keep your basement dry, warm, and safe with the right installation and waterproof methods.
Common Basement Insulation Mistakes
You want your basement project to go well. But some mistakes can cause big trouble. Let’s look at common problems and ways to avoid them.
Ignoring Moisture Problems
Moisture can ruin a dry basement. If you skip checking for water, your insulation and subfloor can get damaged. You might see mold, rot, or ruined floors. Here’s what can happen:
If you ignore moisture, you can have big problems. Water can move up from under the slab. It can also collect on top of the slab. This can hurt your insulation and the floor above.
If water builds up on the moisture barrier, mold and rot can start. This makes your insulation weak and your floor unsafe.
Always check for leaks and wet spots before you begin. This step helps keep your basement safe.
Using Incorrect Insulation Types
Choosing the wrong insulation can mess up your basement. Some types, like fiberglass batts, soak up water and get weak. You need materials that stay dry and strong. Look at this table to see what happens if you pick the wrong kind:
Mistake | Problem | Consequence |
|---|---|---|
Using Fiberglass Batts Against Foundation Walls | Takes in water from concrete, loses R-value | Musty basement, failed insulation, costly repairs |
Improper Vapor Barrier Placement | Traps water, mold can grow | Damage to structure, health problems |
Pick insulation that blocks water and works with a waterproof barrier. This keeps your basement safe and comfy.
Poor Sealing Techniques
Bad sealing lets cold air and water get inside. You might feel drafts, cold spots, or see your bills go up. Mold and wet spots can also appear. Here’s a simple guide to spot and fix sealing problems:
Signs of Poor Insulation | Solutions |
|---|---|
Cold spots or drafts | Add or change insulation near windows and doors |
High energy bills | Make basement insulation better to save energy |
Mold or condensation | Put in moisture barriers and add ventilation |
Drafts near windows | Use weatherstripping or sealant tape |
Gaps around corners | Use caulk or special tape |
Seal every joint and edge for the best results. Good sealing keeps your basement dry and warm.
Remember, if you avoid these mistakes, your basement insulation will work better. You save money, protect your house, and enjoy a cozy room.
Basement Subfloor Troubleshooting And Maintenance
 Spotting Moisture Or Mold
 Spotting Moisture Or Mold
You want to catch problems early before they get worse. If you notice a musty smell or see dark spots on your basement floor, you might have mould or moisture issues. Here are some ways you can spot trouble:
Use a moisture meter to check wood or concrete subfloors. This tool tells you if the area is too damp.
Look for warped or cupped floorboards. These signs often mean water is sneaking in.
Check for visible mould, stains, or soft spots. These can show up fast if water gets trapped.
Remove any old flooring and inspect underneath. Sometimes, moisture hides below the surface.
Make sure you have a vapor barrier in place. This helps stop moisture before it causes damage.
Tip: If you find mould, act quickly. Clean the area and fix the source of moisture right away.
Fixing Insulation Issues
When you find a problem, you need to fix it so your basement stays warm and dry. Take a look at this table to see what makes good insulation and how you can improve your setup:
Feature | Description |
|---|---|
Thermal Barrier | Blocks cold from concrete and keeps your floor surface warm. |
Moisture Resistance | Uses materials that do not soak up water or grow mould. |
Insulation Value | SilverGlo™ insulation gives better results than regular foam. |
Installation | Interlocking panels make it easy to fix or replace sections. |
Comfort | Stops heat loss and keeps your basement cozy. |
If you spot damaged insulation, replace it with panels that resist moisture and mould. Make sure each panel fits tight and seals well. You want to keep your subfloor strong and dry.
Routine Basement Checks
Regular checks help you catch problems before they get big. You should look over your basement every few months, especially if you live in a wet area. Here’s what you can do:
Inspect insulation for cracks, gaps, or soft spots.
Watch for higher heating or cooling bills. This can mean your insulation needs help.
Smell for musty odors. These can warn you about hidden moisture or mould.
Check gutters and drainage outside. Water from outside can sneak into your basement.
Use a dehumidifier and keep air moving to lower humidity.
Note: Frequent checks keep your basement safe and your subfloor in good shape. You save money and avoid big repairs.
You can insulate and waterproof your basement subfloor by following a few simple steps. First, seal gaps and cracks to keep moisture out. Next, choose the right insulation and vapor barrier for your basement. Then, install panels and seal all joints. Here are some benefits you get:
Your basement stays dry and comfortable.
Your home value goes up.
Ready to start? Gather your tools, plan your project, and make your basement a better place.
FAQ
How do you know if your basement needs subfloor insulation?
You can check for cold floors, damp spots, or musty smells. If you feel chilly or see mold, your basement probably needs insulation. A moisture meter helps you spot hidden problems.
What is the best insulation for basement subfloors?
You get the best results with rigid foam panels like XPS or polyiso. MgO boards also work well. These materials resist moisture and keep your basement warm.
Can you install subfloor insulation yourself?
Yes, you can! Most homeowners install subfloor insulation with basic tools. You need to follow each step carefully. Always check for moisture before you start.
How often should you check your basement insulation?
You should inspect your basement every few months. Look for wet spots, mold, or cold areas. Regular checks help you catch problems early.
Do you need a vapor barrier under basement subfloor insulation?
Yes, you do. A vapor barrier keeps moisture out and protects your insulation. You want to use plastic sheeting or closed-cell spray foam for the best results.