

05 Aug 7 Tips for Choosing Moisture-Resistant Floor Sheathing
Table of Contents
- 1 Key Takeaways
- 2 Material Options
- 3 Moisture Resistance Ratings
- 4 Strength & Durability
- 5 Water-Resistant Subfloor Installation
- 6 Insulation & Compatibility
- 7 Maintenance Needs
- 8 Cost vs. Value
- 9 Choosing the Best Subfloor
- 10 FAQ
- 10.1 What is the best material for moisture-resistant floor sheathing?
- 10.2 How often should you inspect your subfloor for moisture damage?
- 10.3 Can you install moisture-resistant sheathing over concrete?
- 10.4 Do you need to seal the seams of your subfloor panels?
- 10.5 What is the difference between OSB and plywood for wet areas?
You want your floor sheathing to last a long time and stay strong. Moisture can cause big problems like warping, decay, or mold. If you pick materials that resist moisture and put them in the right way, you help keep your home safe from expensive damage. For example, panels with moisture-resistant resins stop the wood from breaking down. Good installation, like sealing joints and using the right fasteners, also keeps out water and helps your floor stay safe for many years.
Key Takeaways
Pick strong, moisture-resistant materials like MgO board or marine-grade plywood for wet places. This helps stop swelling and mold.
Always start with a clean, dry surface. Use vapor barriers and seal all seams. This keeps water out and protects your subfloor.
Check your floor sheathing often for damage like warping or mold. Fix problems fast to avoid expensive repairs.
Use the right thickness and strong fasteners. This helps your floor stay solid and fight moisture damage over time.
Buying good materials and installing them right saves money later. It cuts down on repairs and makes your floor last longer.
Material Options
When you pick subfloor sheathing, you can choose from a few water-resistant materials. Each one has special features that change how well it handles moisture. Picking the right one helps your subfloor last longer. It also keeps your home safe from harm.
Description | Moisture Resistance Characteristics | Cost Consideration | |
|---|---|---|---|
Oriented Strand Board (OSB) | Wood flakes glued and pressed in layers; popular and low cost. | Moisture sensitive; edges can swell; prone to rot and water damage. | Lowest cost option. |
Plywood | Made from thin sheets of wood veneer; structurally stronger and more water resistant than OSB. | More moisture resistant than OSB; not rot-proof but better durability. | More expensive than OSB but worth it for quality. |
Engineered/Manufactured Sheathing (e.g., Zip System) | OSB with integrated weather-resistant barrier; some with insulation backing. | Enhanced moisture resistance and air tightness due to integrated barrier. | Most expensive option among the three. |
Plywood
Plywood is a common pick for subfloor sheathing. It is made from thin wood layers glued together. This makes it strong and steady. There are special types like pressure-treated plywood and marine-grade plywood. Marine plywood uses waterproof glue and good wood. It does not swell or bend easily. This makes it great for wet places. Plywood is lighter than OSB and easy to move. It does not split or break as much under weight. But it costs more than OSB. Knots in the wood can make it weaker over time. To get the best results, seal the edges and check for problems often.
Tip: Use marine-grade plywood or resin-based panels like AdvanTech in bathrooms, kitchens, or laundry rooms where water is a big problem.
OSB
OSB is a popular and cheap subfloor sheathing. It is made from wood flakes pressed with waterproof resin. Regular OSB soaks up water fast. This can make it swell and get damaged. Some OSB panels have resin barriers. These stop water better and dry out faster. These panels are good for subfloors in places with some water. But do not use them where it is always wet. OSB is heavier than plywood. You may need to be careful when putting it in.
OSB costs the least.
High-performance OSB keeps out water better than regular OSB.
Mgo Board
MgO board is different from other water-resistant materials for subfloor sheathing. It has a surface that does not let water in. This board stays strong and keeps its shape in wet or damp places. MgO board does not get mold or mildew. This makes it good for basements, bathrooms, and other wet rooms. MgO board does not swell or bend like plywood or OSB. It costs more, but it gives great water protection and lasts a long time.
Moisture Absorption | Swelling Risk | Best Use Areas | |
|---|---|---|---|
OSB | High | Yes | Dry interiors |
Plywood | High (similar to OSB) | Yes | Dry interiors |
MgO Board | Very Low | No | Wet, humid locations |
Moisture Resistance Ratings
Knowing how subfloor sheathing deals with moisture helps you choose well. You should look at two things: exposure ratings and what the manufacturer says. These facts show how well a material stands up to water. They also tell you how long it will last in damp places.
Exposure Ratings
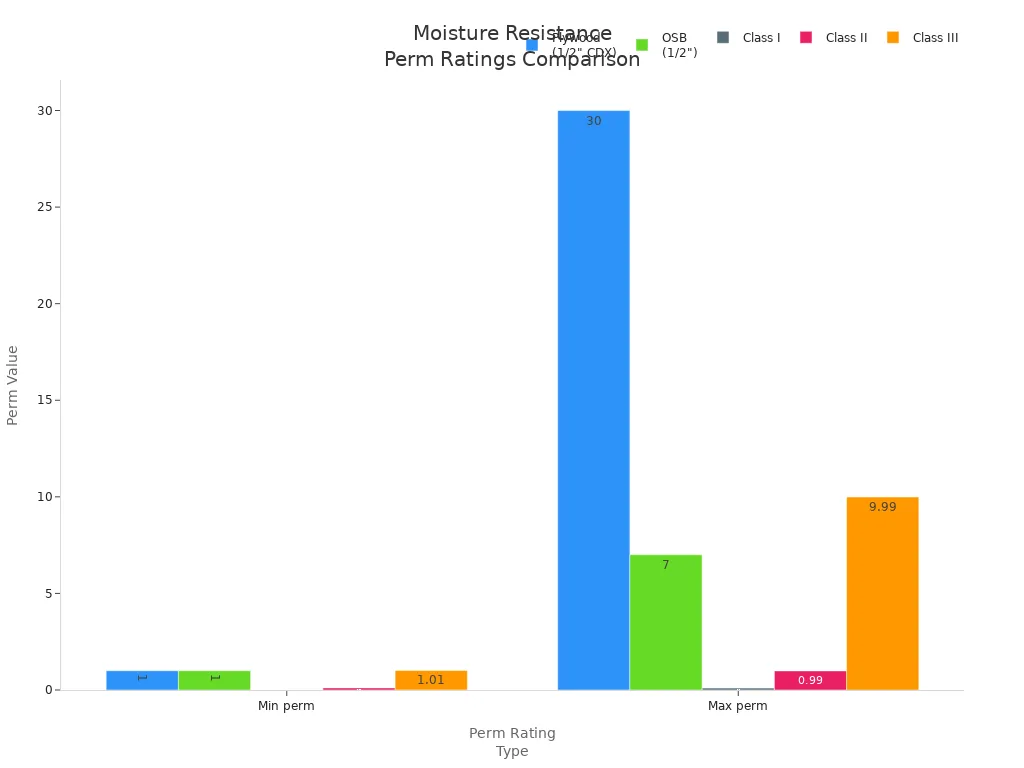
Exposure ratings show how much moisture a subfloor sheathing panel can take before it gets damaged. You can find these ratings on product labels or in technical sheets. The most common way to measure this is with perm ratings. If a material has a higher perm rating, it lets more water vapor go through. If it has a lower perm rating, it keeps out water vapor better.
Material | Typical Perm Rating Range | Notes on Moisture Resistance and Use |
|---|---|---|
Plywood (1/2″ CDX) | 1 to 30 perms | Absorbs and releases moisture; not a vapor barrier |
OSB (1/2″) | 1 to 7 perms | Lower perm than plywood; not a vapor barrier |
Vapor Retarder Class | Perm Range (ASTM E 96 Desiccant Method) | Description |
|---|---|---|
Class I | 0.1 perm or less | Strong vapor barrier |
Class II | >0.1 to <1.0 perm | Moderate vapor retarder |
Class III | >1.0 to <10 perms | Light vapor retarder |
Perm ratings come from tests that check how much water vapor moves through a material. These tests use set humidity and follow the ASTM E 96 method.
Tip: Always look at the exposure rating before you buy subfloor sheathing. This helps you pick the right panel for wet or dry spots.
Manufacturer Specs
Manufacturers make their subfloor sheathing better at stopping water by using special resins, coatings, or building methods. For example, LP Legacy Premium Sub-Flooring uses extra wood strands, resin, and wax. It also uses Gorilla Glue Technology to cover each strand. This makes the panel strong against water and keeps it stiff. LP gives a No-Sand Warranty and a Lifetime Limited Warranty for moisture problems.
DensGlass Sheathing uses fiberglass mat gypsum. It has the highest mold resistance rating of 10 under ASTM D3273. It also does not bend or sag, even when it is humid. This makes it a good pick for places with lots of water.
Georgia-Pacific’s DryMax High-Performance OSB Sub-Floor is rated as Exposure 1. This means it can handle water during building delays. It is the most moisture-resistant OSB they make and comes with a 500-day no-sand warranty.
Note: Always read the manufacturer’s specs and warranty details. These tell you how much moisture resistance you can expect from your subfloor sheathing.
Strength & Durability
Picking strong and tough floor sheathing helps your floors last longer. This is very important in places where water can be a problem. You want panels that can hold heavy things and not get damaged from people walking on them every day. The right thickness and type of panel also stop squeaks, bouncing, or sagging.
Load Capacity
Your floor sheathing must hold up people, furniture, and appliances. Stronger panels, like Structural I sheathing, have high bending and shear strength. They also have a water-resistive barrier. This makes the floor stronger and helps keep out water. But being strong is not enough to stop water damage over time. The water-resistive barrier is what really protects the floor from moisture. Wood panels, like plywood and OSB, can get bigger or smaller when wet. If you do not leave space between panels, they might buckle. Buckling looks bad and can cause problems, but it does not mean the floor is weak. Always follow spacing rules to help stop water damage.
Tip: Use tongue & groove edges for better support. This keeps panels locked together. It helps spread weight and stops too much movement.
Thickness Matters
How thick your floor sheathing is changes how strong it is and how well it stands up to water. Thicker panels, like 7/8-inch or 1-inch, are best for wide joist spans or engineered wood floors. These panels stop bouncing and squeaks, so your floor feels solid. Most homes use 3/4-inch CDX plywood or OSB for joists 16 inches apart. This thickness gives good strength and holds weight well. Thicker panels also help meet building codes and span ratings. This keeps your floor safe and strong. Thicker panels do not block water by themselves, but they last longer and fight off water damage better. In wet or tough climates, thicker panels work better and help stop water damage. Always check local codes and what the manufacturer says to pick the right thickness for your project.
Water-Resistant Subfloor Installation
Vapor Barriers
When you install a water-resistant subfloor, you need to think about vapor barriers. These barriers stop moisture from moving up through the ground or concrete. If you have a basement or crawl space, a vapor barrier is very important. You want to keep your subfloor dry and strong for many years.
Use a polyethylene sheet that is at least 6 mil thick. This type of barrier works well for basements and crawl spaces.
Cover the entire floor area and extend the barrier up the walls by at least 6 inches.
Overlap seams by 12 inches and seal them with tape. Make sure the edges are secure.
Clean the floor before you put down the barrier. Dirt or debris can keep the barrier from working right.
Check the vapor barrier often. If you see any damage, fix it right away.
Tip: Vapor barriers help prevent mold, wood rot, and damage to insulation. They also make your home more comfortable and energy efficient.
If you install a water-resistant subfloor over concrete, always test for moisture first. Let the concrete dry fully before you start. This step helps you avoid problems later.
Sealing Seams
Sealing seams is a key step for any water-resistant subfloor. Water can sneak through even the smallest gaps. You need to stop this from happening.
Use flexible sealants or caulk on all seams and corners. Products like Hydro-Blok work well for this job.
Apply sealant around pipes, tubs, toilets, and other fixtures. This keeps water from getting under your subfloor.
Overlap sheet membranes by at least 2 inches. If you use a liquid membrane, put on several coats and let each one dry.
Leave small expansion gaps around the edges, but seal them with waterproof trim in wet areas.
Press planks or panels tightly together. Make sure there are no gaps between them.
Sealing seams and edges protects your water-resistant subfloor from moisture. This step keeps your subfloor strong and helps prevent costly repairs.
If you follow these steps, your water-resistant subfloor will last longer and keep your home safe from moisture problems.
Insulation & Compatibility
 Subfloor Systems
 Subfloor Systems
Think about how insulation and your subfloor work together. Using the right insulation with a moisture-resistant subfloor helps your floor last longer. Closed cell spray foam insulation is a great choice for subfloor systems. It keeps water out and makes the floor stronger. This insulation acts as a vapor barrier. It blocks water from moving up into your subfloor. Rigid foam insulation is another good option. It is strong and does not let water in. This makes it good for many homes.
Rubber underlayments and vapor barrier types also help protect your subfloor from water. Rubber underlayment works well in places with lots of humidity. It stops water and makes the floor quieter. Vapor barrier underlayments seal out water. This helps stop moisture damage. When you match your insulation and subfloor, your floor is strong and saves energy. It also stays safe from water problems.
Note: Always get your subfloor ready before adding insulation. Make sure it is clean and dry. This helps stop mold and mildew from growing.
Preventing Moisture Traps
You do not want to trap moisture under your subfloor. Moisture traps can cause warping, swelling, and mold. To keep your floor safe, follow these steps:
Check and take care of foundation vents. Use fans with humidistats to control moisture when it gets high.
Put vapor barriers in crawl spaces. These work with vents to keep your subfloor dry.
Slope the ground around your house so water flows away. Keep gutters and downspouts clear.
Seal all cracks and gaps in your subfloor with the right sealant.
Put on waterproof coatings like epoxy or urethane after cleaning and drying your subfloor.
Use dehumidifiers in crawl spaces or basements. Keep humidity between 30-50%.
Watch humidity with gauges and fix leaks right away.
These steps help stop moisture damage and keep your subfloor in good shape. Good insulation and subfloor compatibility stop water from getting trapped. This keeps your floor strong, comfortable, and energy efficient for a long time.
Maintenance Needs
Inspection
You should check your floor sheathing often to catch problems early. Regular inspections help you spot damage before it gets worse. Most experts suggest looking at your subfloor every few months. Here is a simple checklist to follow:
Look for cracks, warping, or soft spots on the surface.
Check for signs of mold or mildew, especially in damp areas.
Make sure all seams and edges are sealed tight.
Inspect around plumbing and exterior walls for leaks or water stains.
Keeping your sheathing dry is important. Clear gutters and downspouts so water does not collect near your home. Prevent standing water or snow from sitting on your subfloor. This helps stop edge swelling and other types of damage.
You should also re-seal seams and edges as needed. Over time, sealants can wear out. Fresh sealant keeps your moisture barrier strong and helps prevent moisture damage.
Repairs
If you find damage or moisture damage during inspection, act quickly. Fixing small problems right away can save you from bigger repairs later. Here are the main steps for repairing floor sheathing:
Assess how much damage there is. Look for soft, rotten, or swollen spots.
Remove all damaged or rotted panels until you reach solid wood.
Check the floor joists underneath. Repair or replace them if they show signs of damage.
Cut new panels to fit the area you removed.
Use a strong adhesive to attach the new panels. This helps prevent squeaks and adds strength.
Leave a small gap (about 1/8 inch) between old and new panels for expansion.
Nail the new panels down, keeping nails away from the edges.
Sometimes you may need to remove exterior veneers or get inside the floor to fix hidden damage. If you see mold, you might need a specialist. After repairs, add new moisture and air barriers to stop future problems.
Tip: Always address the source of water before making repairs. Stopping leaks and improving drainage will help prevent more moisture damage in the future.
Cost vs. Value
Upfront Cost
When you pick floor sheathing, prices can be very different. Some types are cheap at first, but others cost more and last longer. Look at the table below to see how much each kind costs:
Material Type | Approximate Upfront Cost (per sq ft) |
|---|---|
Basic Plywood | $2.50 – $3.50 |
Oriented Strand Board (OSB) | $2.50 – $4.50 |
DRIcore | $2.50 – $9.00 |
Amdry | $3.00 – $10.00 |
Barricade | $2.00 – $10.00 |
Warmboard | Around $7.00 |
Concrete Subfloor | Around $6.00 |
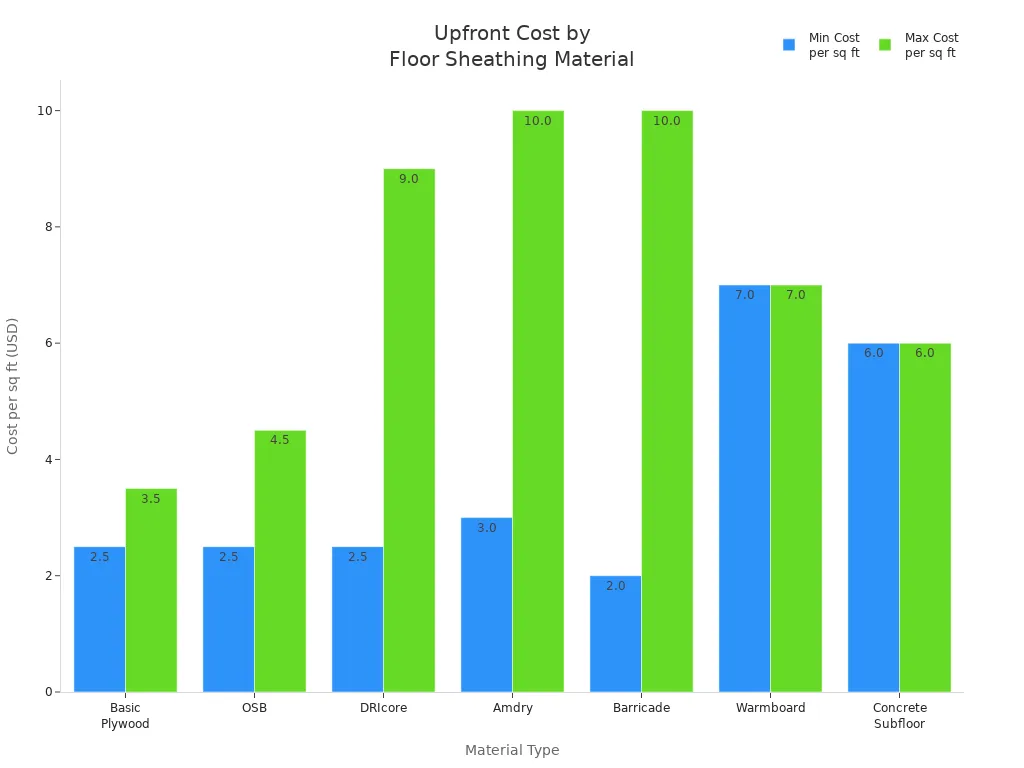
Basic plywood and OSB are the cheapest choices. DRIcore, Amdry, and Barricade cost more, but they keep out water better. Some panels, like marine-grade plywood, can cost a lot per sheet. The price can be as high as $260 for one sheet. This means the best subfloor might cost more at first, especially in wet places.
Tip: If you build in a basement, bathroom, or laundry room, spend more on a good subfloor. This helps you avoid fixing water damage later.
Long-Term Savings
Spending more on a good subfloor can save you money later. Premium panels keep water and mold away from your home. They help your floors stay strong for a long time. You will not need to fix or replace them as often. Some panels have a 30-year warranty, so you do not have to worry about big repair bills.
Premium panels keep water and air out.
Strong panels and water barriers stop damage.
These panels are easy to install and keep the work area clean.
You save money because you do not need many repairs.
If you use the best subfloor in wet rooms, you get better protection and value. Your home stays safe and strong for many years.
Choosing the Best Subfloor
Climate Considerations
When choosing the best subfloor, you need to think about your local climate. Weather and humidity can change how your subfloor performs. If you live in a place with high humidity or lots of rain, you should:
Learn about your region’s humidity and seasonal changes before picking a subfloor.
Pick subfloor materials, moisture barriers, and adhesives made for wet climates.
Use vapor barriers or retarders that match your area and the grade level, especially for basements.
Keep indoor humidity between 30% and 50%. This helps prevent swelling, warping, and mold.
In dry climates, use kiln-dried materials to stop gapping and creaking.
Make sure your installer follows guidelines from the National Wood Flooring Association.
You also want to think about how much foot traffic your floors get. If you have kids or pets, or if people often come in with wet shoes, you need a subfloor that can handle moisture and wear. The best subfloor for your home will match your climate and daily needs.
Tip: Use a hygrometer to check your home’s humidity. Adjust with a humidifier or dehumidifier as needed.
Room Usage
Room type plays a big role in choosing the best subfloor. Wet rooms like bathrooms, basements, and kitchens need extra protection. For these spaces, you should:
Use MgO board for wet rooms. It is waterproof, mold-proof, and does not swell.
Choose marine-grade or pressure-treated plywood for bathrooms and basements.
Always install a moisture barrier under the subfloor in damp areas.
For dry rooms like bedrooms or living rooms, regular plywood works well.
Think about how much traffic and water the room gets before picking your subfloor.
The best subfloor for each room depends on moisture levels, traffic, and your budget. By choosing the best subfloor for your climate and room, you protect your home from damage and make your floors last longer.
You can keep your home safe from harm by using these seven important tips for moisture-resistant floor sheathing:
Choose strong, water-resistant materials like MGO boards or marine plywood.
Make sure the area is clean and dry before you start.
Check for moisture with a meter before putting in panels.
Put panels in place with strong glue and fasteners so joints stay tight.
Do not use particleboard because it gets ruined when it gets wet.
Look at your floor sheathing often and fix any problems right away.
Keep floors dry by wiping up spills and using mats where people walk a lot.
Picking the right floor sheathing and installing it the right way helps you stop expensive damage. If you are not sure what to do, ask a professional for help with your project.
FAQ
What is the best material for moisture-resistant floor sheathing?
You get the best moisture resistance from MgO board or marine-grade plywood. These materials do not swell or rot. They work well in wet areas like bathrooms and basements.
How often should you inspect your subfloor for moisture damage?
You should check your subfloor every few months. Look for soft spots, mold, or warping. Early inspection helps you catch problems before they get worse.
Can you install moisture-resistant sheathing over concrete?
Yes, you can install it over concrete. Always use a vapor barrier first. This stops moisture from moving up into your subfloor and causing damage.
Do you need to seal the seams of your subfloor panels?
Yes, you need to seal all seams and edges. Sealing keeps water from getting between panels. This step helps your floor last longer and stay strong.
What is the difference between OSB and plywood for wet areas?
Plywood resists moisture better than OSB. OSB can swell and break down if it gets wet. For wet rooms, you should pick plywood or a high-performance panel.