

10 Sep Substrate Floor Basics and Why They Matter
Table of Contents
You might not see the substrate floor, but it supports every step you take. The substrate floor, also called the subfloor, forms the solid base under your finished flooring. If you prepare this layer well, your floors will look better, feel smoother, and last much longer.
Key Takeaways
A good substrate floor helps your new floor look nice and last long. You should check, clean, and make the substrate flat before you start.
Picking the right substrate material is very important. Plywood, concrete, and OSB each have special good points. You should match your floor type to the substrate for the best outcome.
Taking care of your substrate floor is important. Clean up spills right away and check the floor every year. This helps stop problems like mold and bumpy spots.
What Is a Substrate Floor?
Definition and Main Purpose
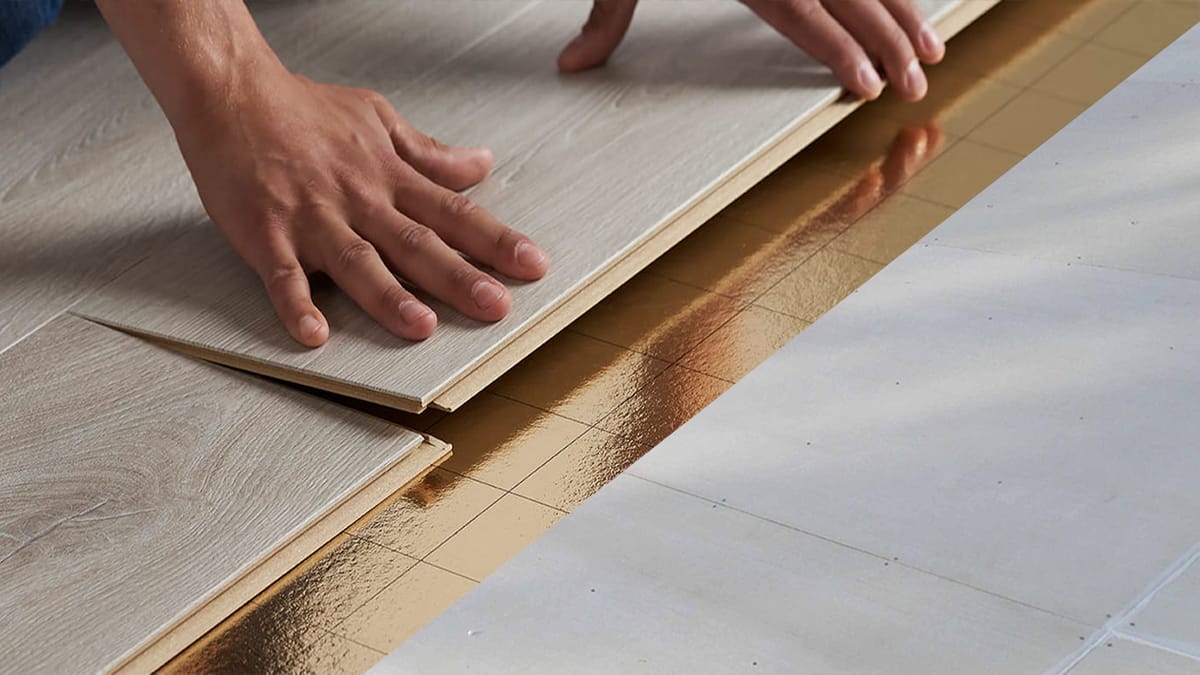
When you start a flooring project, you might hear “substrate floor” or “subfloor.” In building, a substrate is the bottom layer that holds up everything above it. This layer is the base for your finished flooring, like hardwood, tile, or carpet. The substrate floor keeps everything steady and makes your floor strong.
If you prepare the substrate well, your floor will be smooth. You need a smooth base so your finished floor looks nice and feels good to walk on. The substrate also helps stop moisture and other damage. When you walk in a room, the substrate floor spreads your weight across the floor joists. This helps keep your floor safe and stops sagging or squeaking.
The substrate or subfloor spreads weight across the floor joists. It keeps things balanced and gives support.
The subfloor helps keep water and damage away from your finished floor.
The subfloor is important because it gives a flat surface for the finished flooring.
Substrates do more than just hold up your floor. The right substrate floor makes putting in flooring easier and helps it last longer. If you do not prepare it well, you might get uneven floors, loose tiles, or water problems.
Common Materials Used
There are many materials used for substrate floors. Each one has its own good points and works best with certain flooring. Here is a table that shows some common substrate floor materials, what they are like, and where you use them:
Material | Characteristics | Applications |
|---|---|---|
Oriented Strand Board | Cheap, used under wood, carpet, and vinyl. | Common in homes. |
Gypsum Concrete | Strong, fire-safe, needs primer for glue. | Good for heated concrete floors. |
Plywood | Very popular, edges lock together for strength. | Used for subfloors since the 1950s. |
Concrete | Hard, strong, needs moisture barrier in wet places. | Good for tiles and stones. |
Mixed Subflooring | Mix of concrete with plywood or OSB for moisture barrier. | Used in many building projects. |
Sometimes you see stone or metal used, but wood and concrete are most common. Plywood and OSB are popular because they are strong and not expensive. Concrete is good in places that need extra strength or where there is water, like bathrooms or basements.
The kind of substrate floor you have affects what finished flooring you can use. Good substrate floors give better support and stability. Installing the substrate the right way is important for making your finished floor last. For example, hardwood floors need a strong, flat base. Ceramic tiles need a base that keeps out water.
Tip: Always pick flooring that matches your substrate floor. This helps you avoid problems and keeps your floor looking good for a long time.
New substrate materials have made floors better. Now you can find eco-friendly choices like bamboo and cork. There are also mixes that use the best parts of vinyl and laminate. These new materials last longer, keep out water, and can even have smart features like heated floors.
Knowing about substrate materials and their job helps you make good choices for your next flooring project. When you pick the right substrate floor and get it ready, you help your floor look great and last a long time.
Foundation of Durable Floors
 Importance of Preparation
 Importance of Preparation
You need to get the substrate floor ready before you put down any flooring. The steps you take now will affect your whole project. If you skip steps or hurry, your new floor could have problems.
Industry experts say you should follow these steps:
Inspection
Cleaning
Leveling
Priming
Moisture barrier installation
Underlayment installation
Each step helps you avoid hidden problems. Inspection finds weak spots or damage. Cleaning gets rid of dust and dirt that can stop glue from working. Leveling makes the floor flat, so there are no bumps or dips. Priming and moisture barriers keep water away, which stops mold and warping. Underlayment gives extra support and makes the floor feel better.
Tip: Take your time with each step. This helps your floor last longer and look nice.
Impact on Durability and Appearance
A strong substrate is important for a tough floor. If you prepare it well, your floor can handle lots of use. A flat, strong base keeps your floor safe and steady. It also makes your floor look smooth, with no cracks or squeaks.
If you do not prepare the substrate, you might have these problems:
Carpet layers can come apart
Wood planks can bend or buckle
Vinyl can bubble or blister
Glue can fail, making tiles or planks loose
A good substrate floor keeps your flooring safe. It stops the floor from moving and helps the materials last longer. You will not need as many repairs, so you save money. You also keep your warranty, because many companies want you to follow the right steps.
Note: Fixing subfloor problems early can stop future issues like uneven floors, squeaks, or sagging.
Flatness and Levelness
Flatness and levelness are very important. If your substrate is not flat, you will notice it. Cracks, dips, and bumps can show up in your finished floor. These problems make it hard to install flooring and can even cause damage.
Some common problems from bad flatness and levelness are:
Cracks from bad concrete mixes or curing
Height changes that make flooring hard to install
Bumpy surfaces from uneven concrete
Dips or low spots from the ground settling
There are rules for how flat a floor should be. For example, ACI 302.1R-96 says FF 35 / FL 25 for busy areas. USA MASTERSPEC® says at least FF 20 / FL 17 for thin floors. These numbers help you check if your floor is flat enough.
Remember: Pick the right substrate and make sure it is flat and level. This helps your floor last longer and look great.
If you want your floor to stay strong and look good, always focus on the foundation. Good prep, careful checks, and knowing about substrates will save you time, money, and trouble later.
Substrate Floor Assessment and Care
Evaluating the Substrate
Before you install new flooring, you need to check if your substrate floor is ready. Start by looking for signs like cracks, bumps, or loose spots. The surface must be flat, clean, dry, and smooth. If you see old glue, stains, or water damage, fix these first. Use the right tools and tests to check moisture and flatness. Here is a table of common test methods:
Test Method | Description |
|---|---|
Moisture Meter: ASTM F2659 | Checks moisture up to 1 inch below the surface. |
Relative Humidity: ASTM F2170 | Uses probes to measure humidity inside concrete. |
Relative Humidity: ASTM F2420 | Measures humidity on the surface of concrete. |
Calcium Chloride: ASTM F1869 | Measures moisture vapor over 60-72 hours. |
If your substrate fails these tests, do not install flooring yet. Make sure the floor meets industry standards and the floor covering manufacturers guidelines.
Preparation Steps
You need to prepare the substrate before you lay any flooring. Follow these steps:
Assess the floor for cracks, holes, or uneven spots.
Clean the surface to remove dirt, dust, or grease.
Prime the floor to help new materials stick.
Use self-leveling compounds to fix low spots.
Check that the temperature is right for the materials.
Use smoothing tools for an even finish.
Let the floor dry fully before installing flooring.
Moisture control is very important. Many property owners spend billions each year fixing moisture problems. Use adhesives and membranes that handle high humidity. Always test for moisture before you start.
Ongoing Maintenance
After you install your flooring, you need to keep the substrate strong. Sweep or dust the floor every day. Mop weekly with a mild cleaner. Clean up spills right away. For heavy dirt, use spray buffing or burnishing. Sometimes, you may need to remove old finish and apply a new one. Inspect your floor at least once a year, or more often in busy areas. Good care helps your flooring substrates last longer and keeps your floor safe.
Tip: Choosing the right flooring substrate and caring for it will help your floor look great and last for years.
Getting the substrate ready is the first step to a strong floor.
Careful work means you will not need expensive repairs soon.
Your floor will last longer and look nice for years.
You also make your space more comfortable and better for the planet.
Stories from real projects show that good prep always brings good results.
FAQ
What happens if you skip substrate floor preparation?
You may see uneven floors, loose tiles, or squeaks. Water damage can also occur. Always prepare the substrate to avoid these problems.
Can you install new flooring over an old substrate?
You can install new flooring if the substrate is clean, dry, and flat. Remove old glue and repair any damage first.
How do you know if your substrate floor is level?
Use a long level or straightedge.
Check for gaps or rocking.
Fill low spots with leveling compound if needed.